I am wishing all my friends a Happy Independence Day, or Happy 4th of July!!
In honor of the day, here are some flag quilts I have quilted in the last few months.
Enjoy the day with family and friends or working on a special (hopefully quilting) project that brings you joy!
I do quilting for American Hero Quilts, a great organization that donates quilts to active duty, wounded service people. For details on American Hero Quilts and how you can help themClick Here (They always need longarm quilters!)
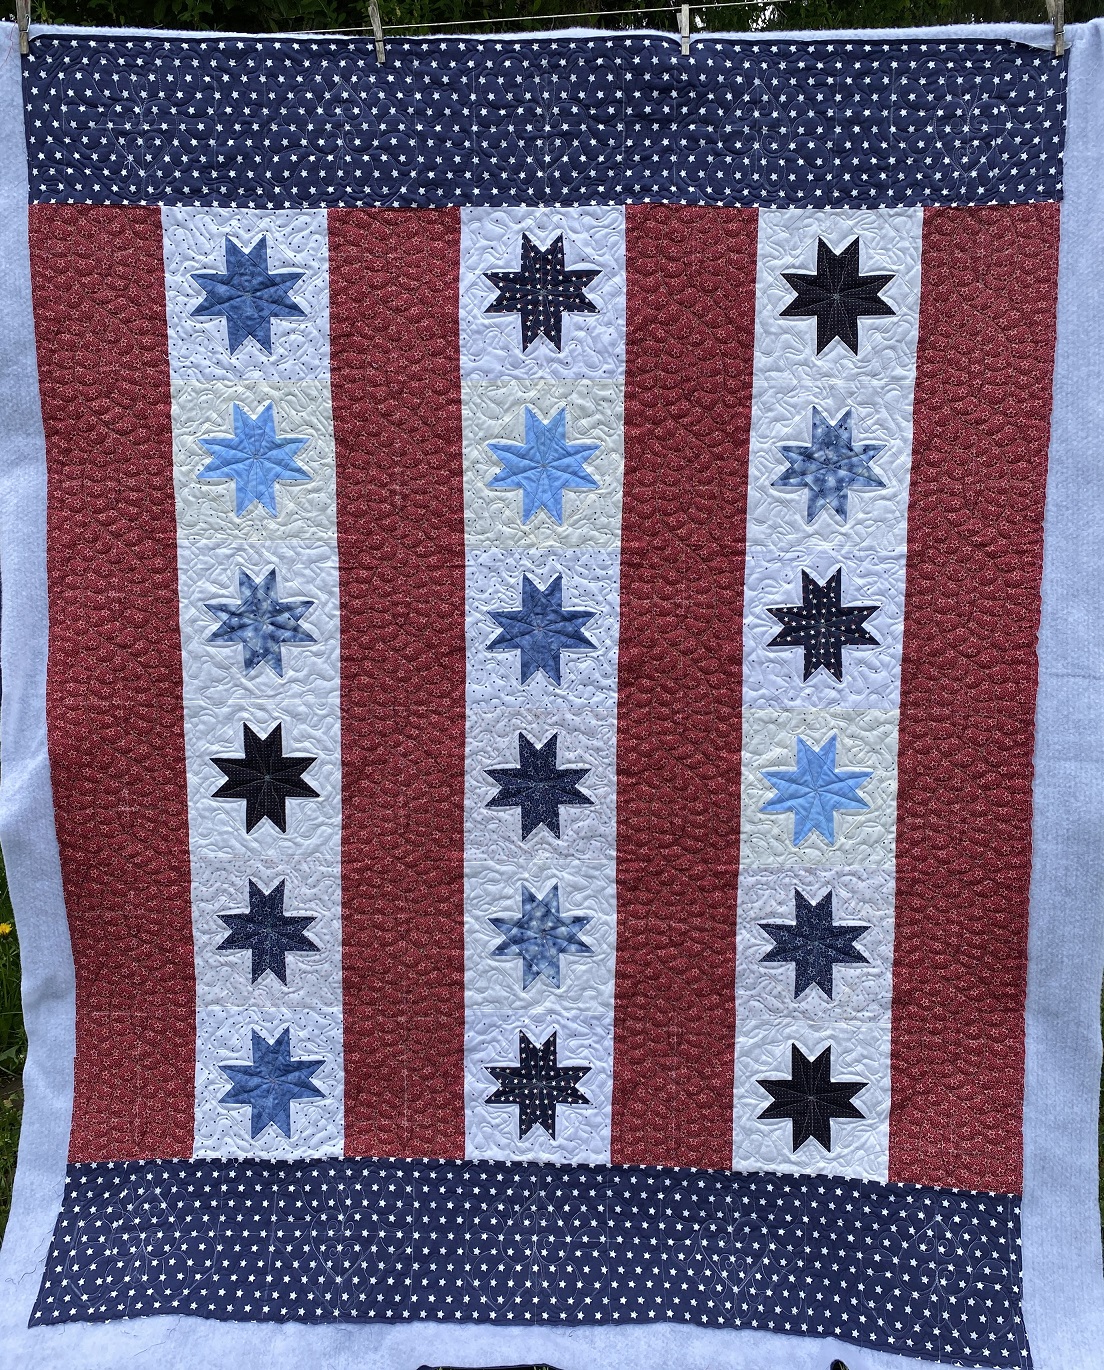
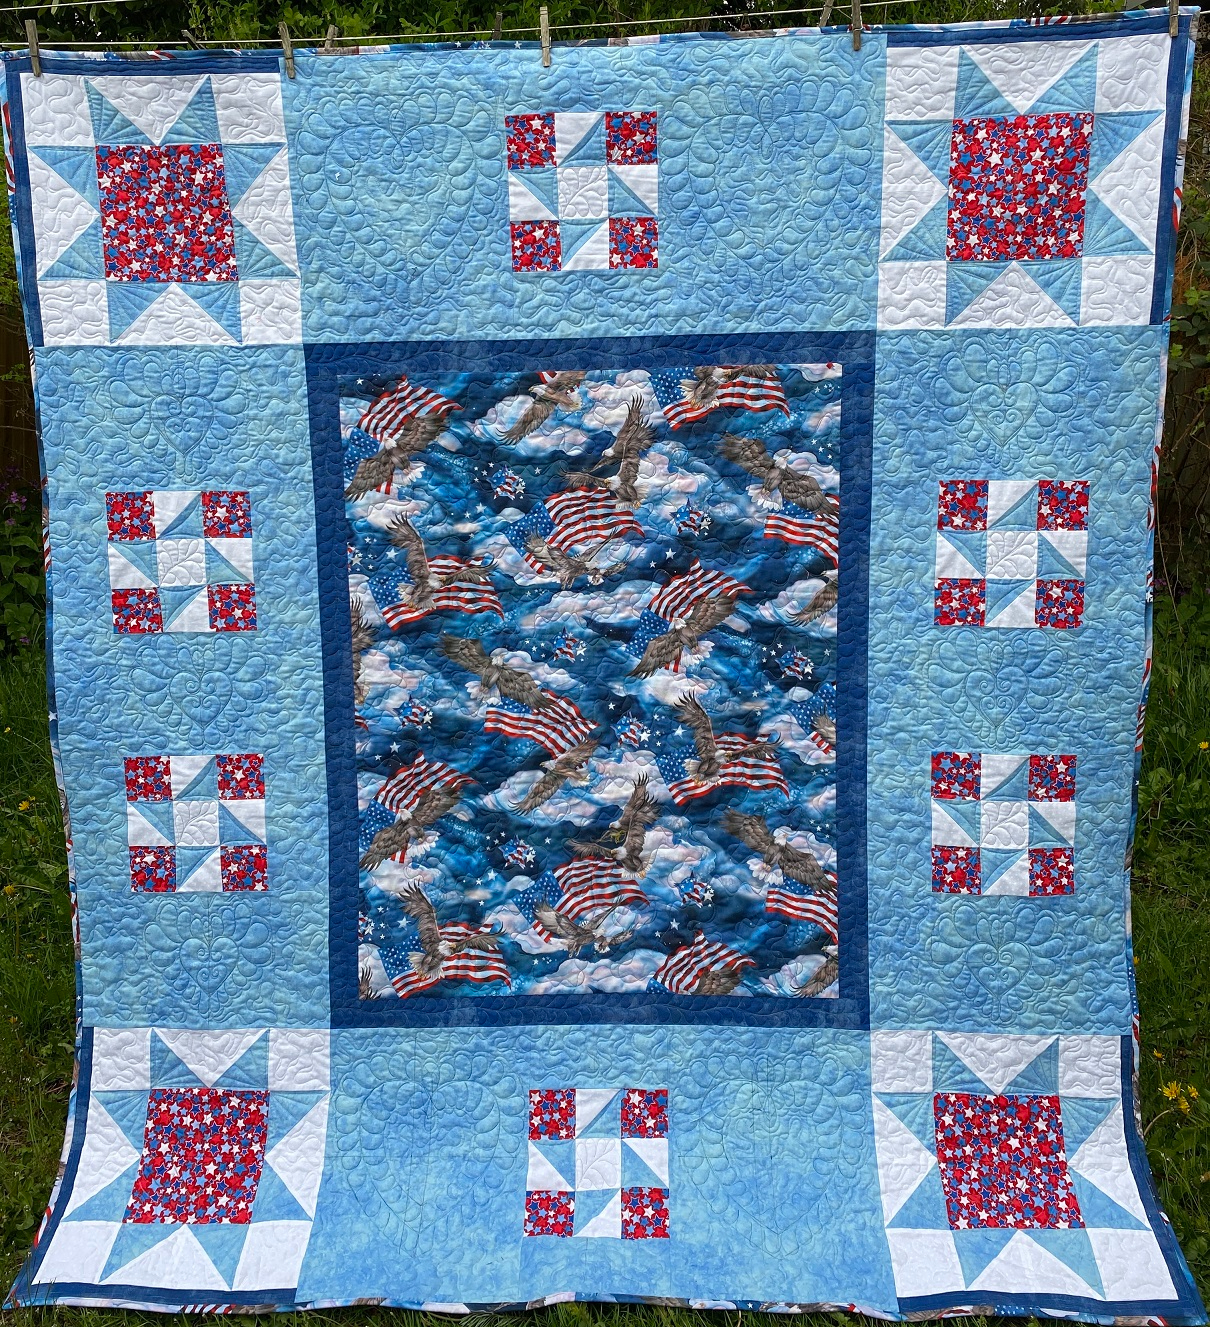
Here is an American Hero Quilt I finished a few weeks ago – click on any photo for a larger view and slide show.
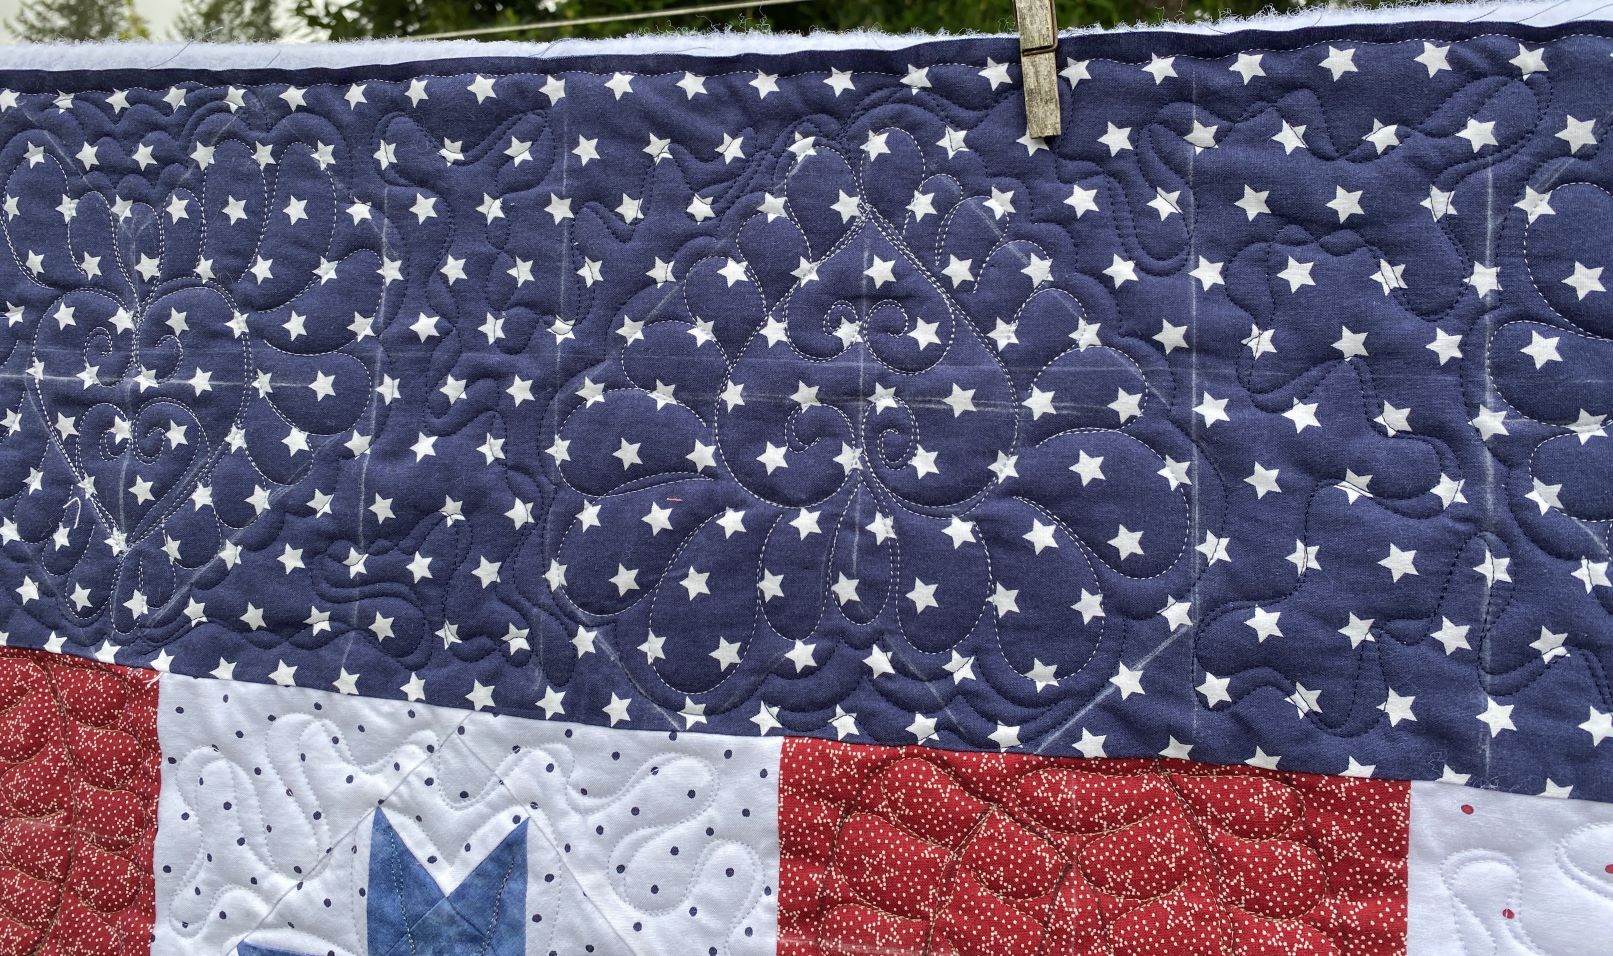
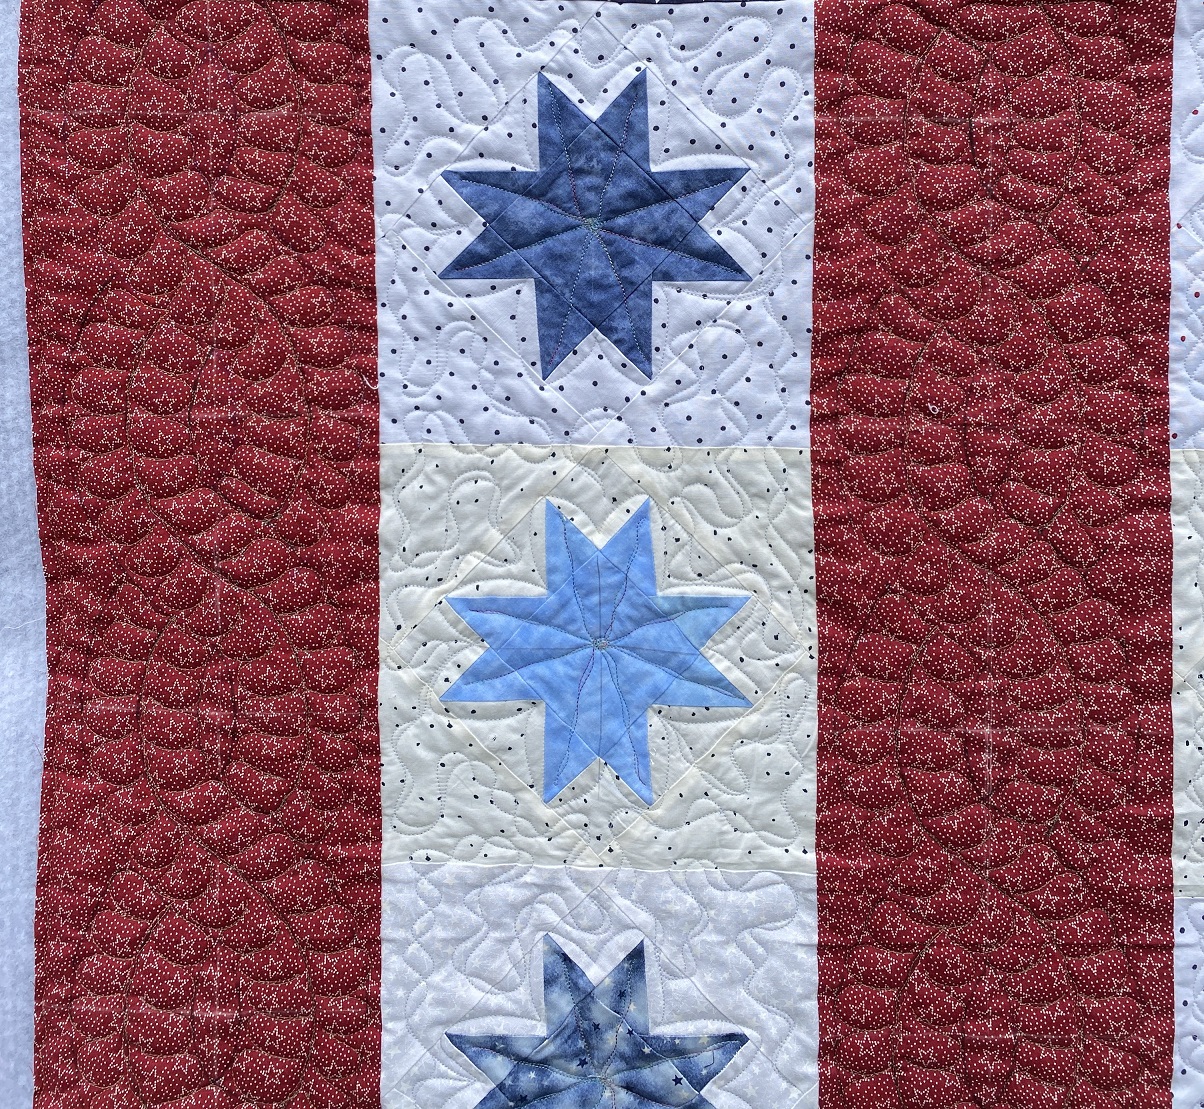
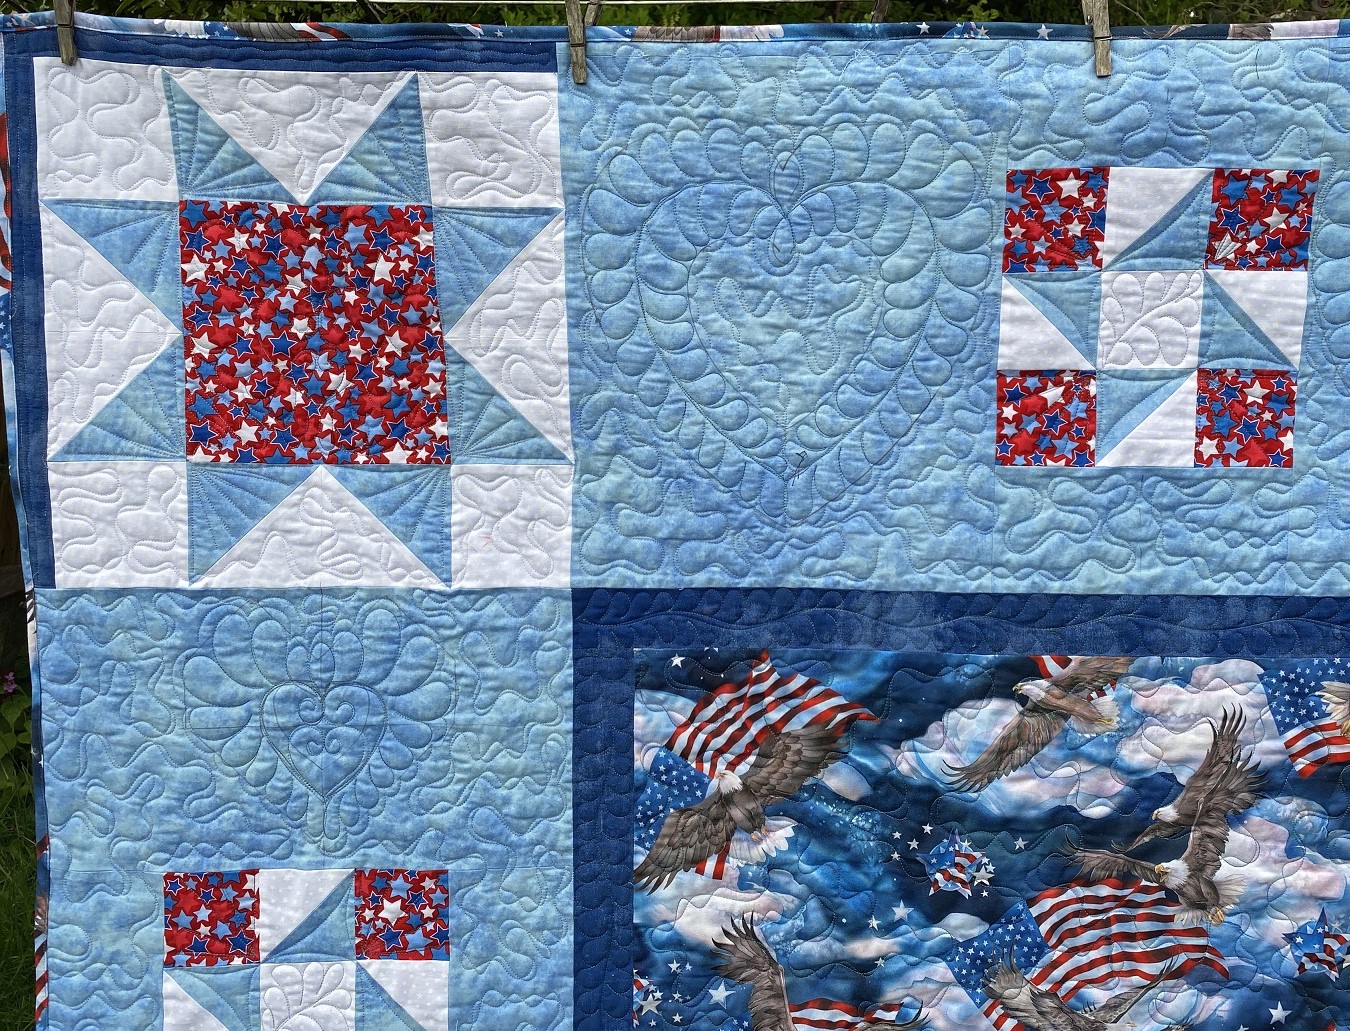
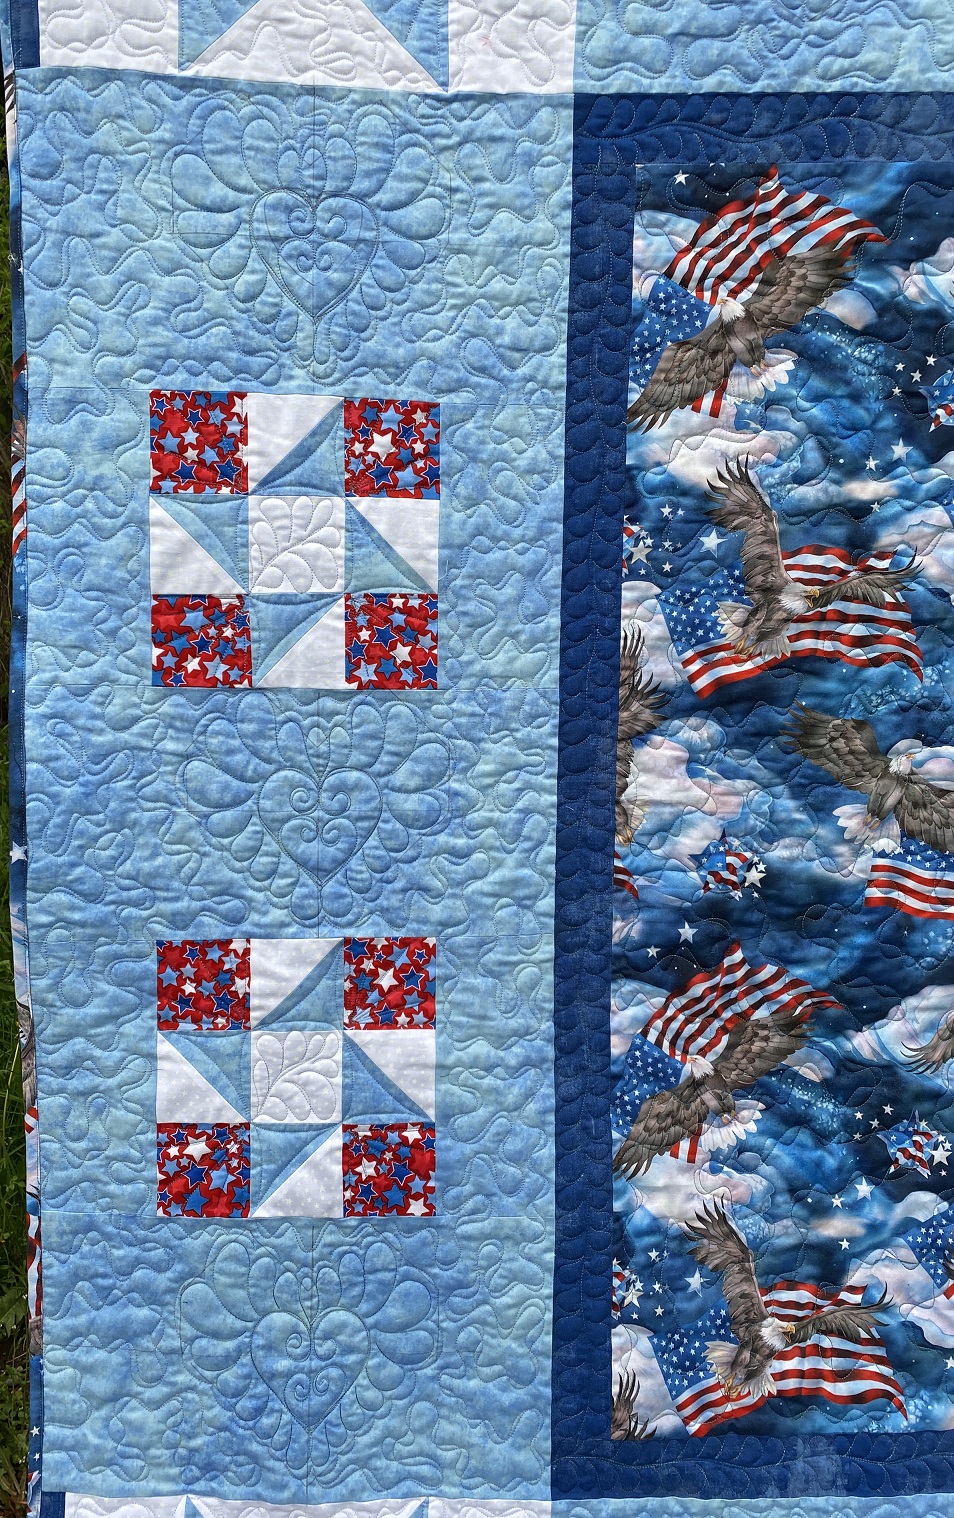
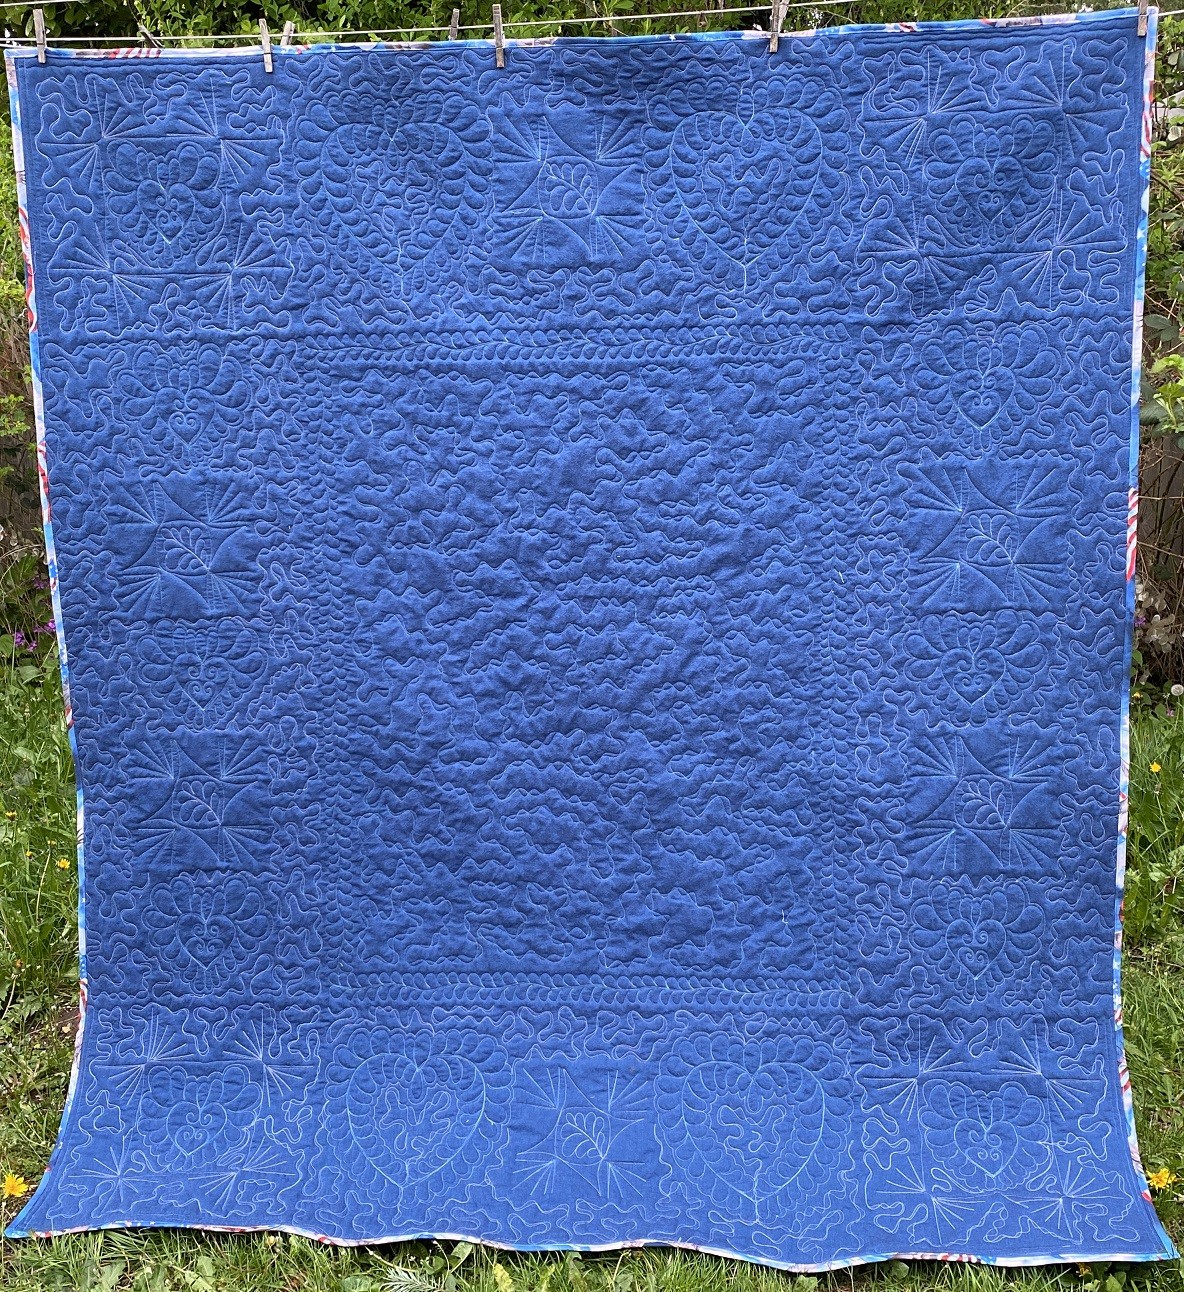
On the top and bottom border, there feathered heart wreaths. In the red stripes there are feather cables and in the star stripes, the stars are quilted with “spikes” and the background has ribbon stipple.
The batting is Warm Company, Soft & Bright and a combination of Signature 100% cotton and Madeira polyester thread was used.
This next quilt is by Pam F. who made it for her mother who was in hospice care. Pam’s Mom loved anything Americana and she loved hearts. Pam is a neighbor and I helped her in the design of the quilt top. Pam wanted “open spaces” so I could do some fancy quilting.
Pam’s Mom LOVED the quilt and Pam has sweet memories of caring for her Mom during her last days.
Click on any photo for a larger view.
Here are the quilting details – batting, Soft & Bright from Warm Company, Signature 100% cotton thread. There are large feathered heart wreaths in the top and bottom borders, smaller feathered heart wreaths in the side borders, ribbon stipple in the center of the quilt, spikes and more feathers in the stars.
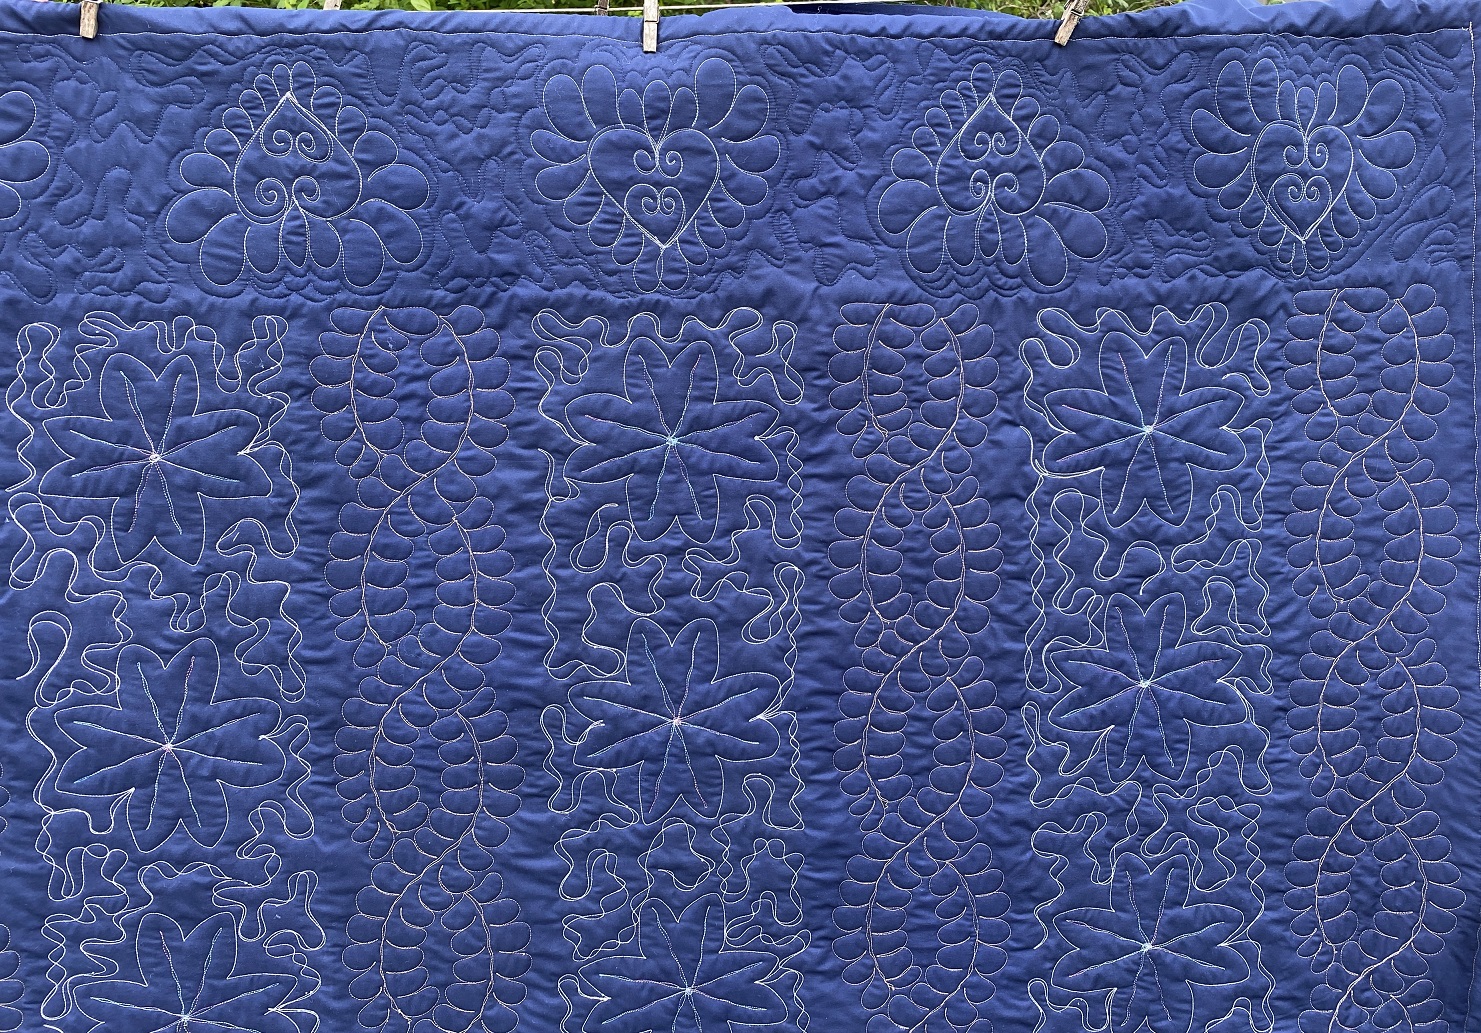
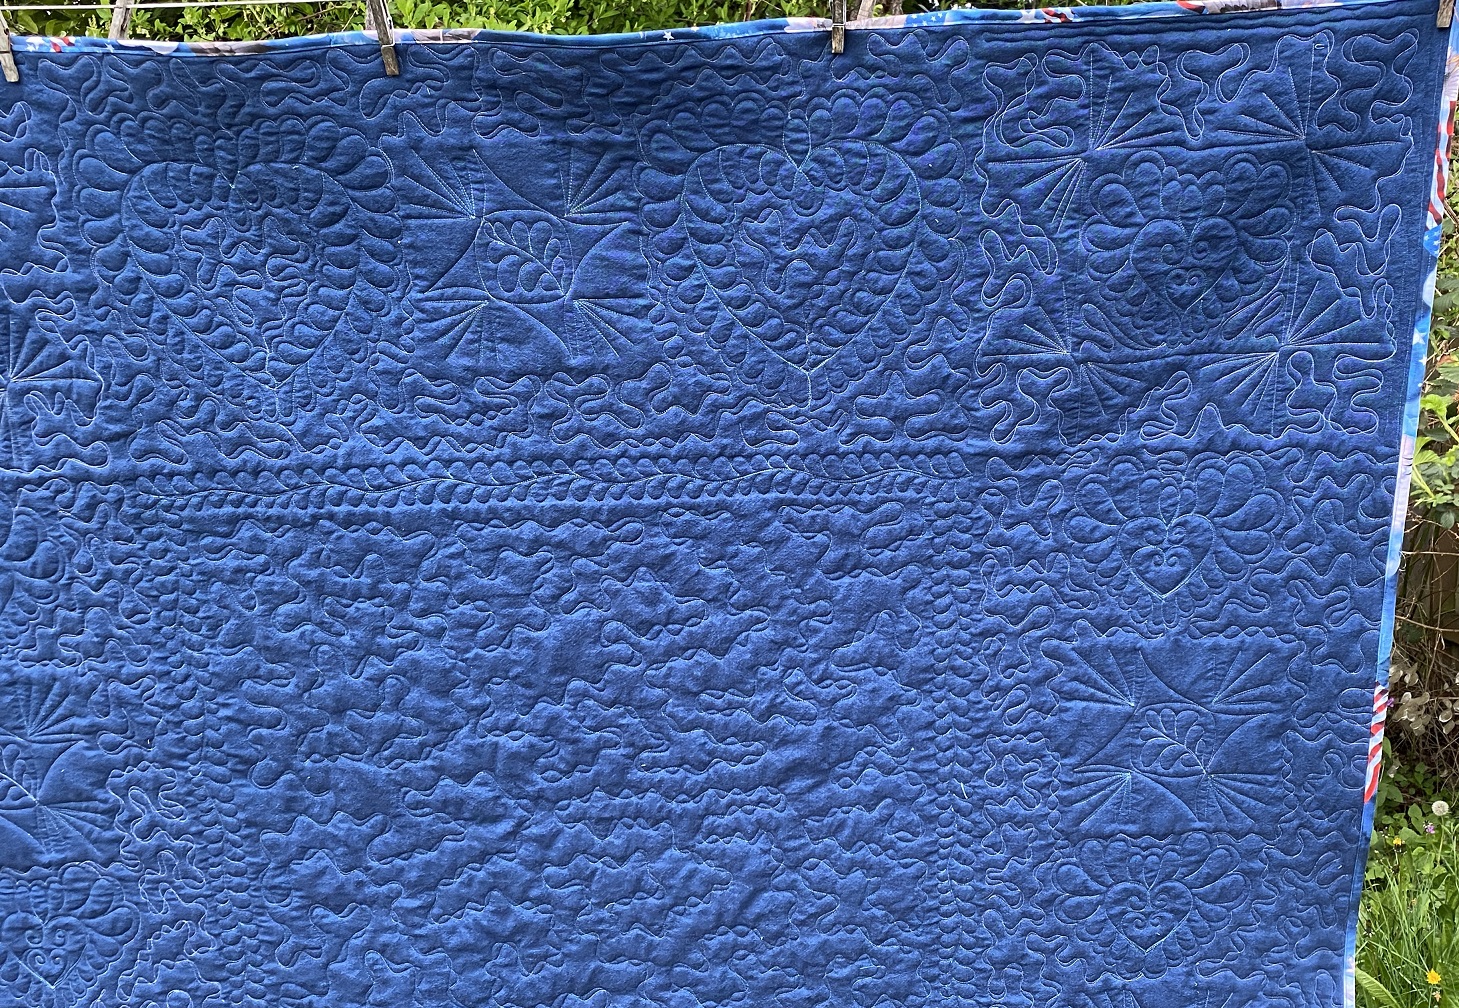
Feathered Hearts in top borer side bordersBack of the quiltBack of the quilt
I am going to spend the rest of today sewing, quilting, relaxing and just enjoying life!
My, oh my, does the time fly! It has been a busy year and I realized that I haven’t posted to my blog for a LONG while! So, today is the day!
I do a TON of stuff – videos, patterns, online classes, in-person classes, etc. – which is all quilting related and I do quilt on real quilts from time to time! The past few months I have been working on some AMAZING quilts and now I want to show you some of them.
This first quilt I am going to highlight is a quilt I made for my Granddaughter Maddie Tong. As with each quilt, there is a story!
This quilt was made from a kit that I found (on a great sale) while visiting with my sister in Illinois. We went “shop hopping” in her area and I found the kit.
Click on any image for a larger view.
I did a little research and this was offered in 2018 by Moda. I purchased the kit in late 2019, pieced it 2021 and finally quilted it earlier this year, 2022.
The quilt is WAY too cute, WAY too much fun to piece and WAY, WAY too much fun to quilt!
Here is the finished quilt! It is a larger twin size.
Here are some of the quilting details –
I quilted a feather cable in the outer borders and a combination of continuous curves, ribbon stipple, swirls and other fill in patterns to complete the quilting, The batting is Warm Company, Soft & Bright and I used an assortment of Signature 100% cotton, machine quilting threads.
For the center Castle block I did straight lines (free hand), wavy cross hatching, continuous curve, landscape stipple and swirls in the hearts.
Here is the back of the quilt and you can see a lot of the quilting detail even though the backing fabric is a fairly busy print
And of course, here is one HAPPY Granddaughter!!
I know she will use and enjoy this quilt for many, many years!
Yes, it HAS been a while since I last posted to my blog! Life has been great and I have been quilting and teaching up a storm!
I have been quilting some wonderful customer quilts the last few months and here are two of them!
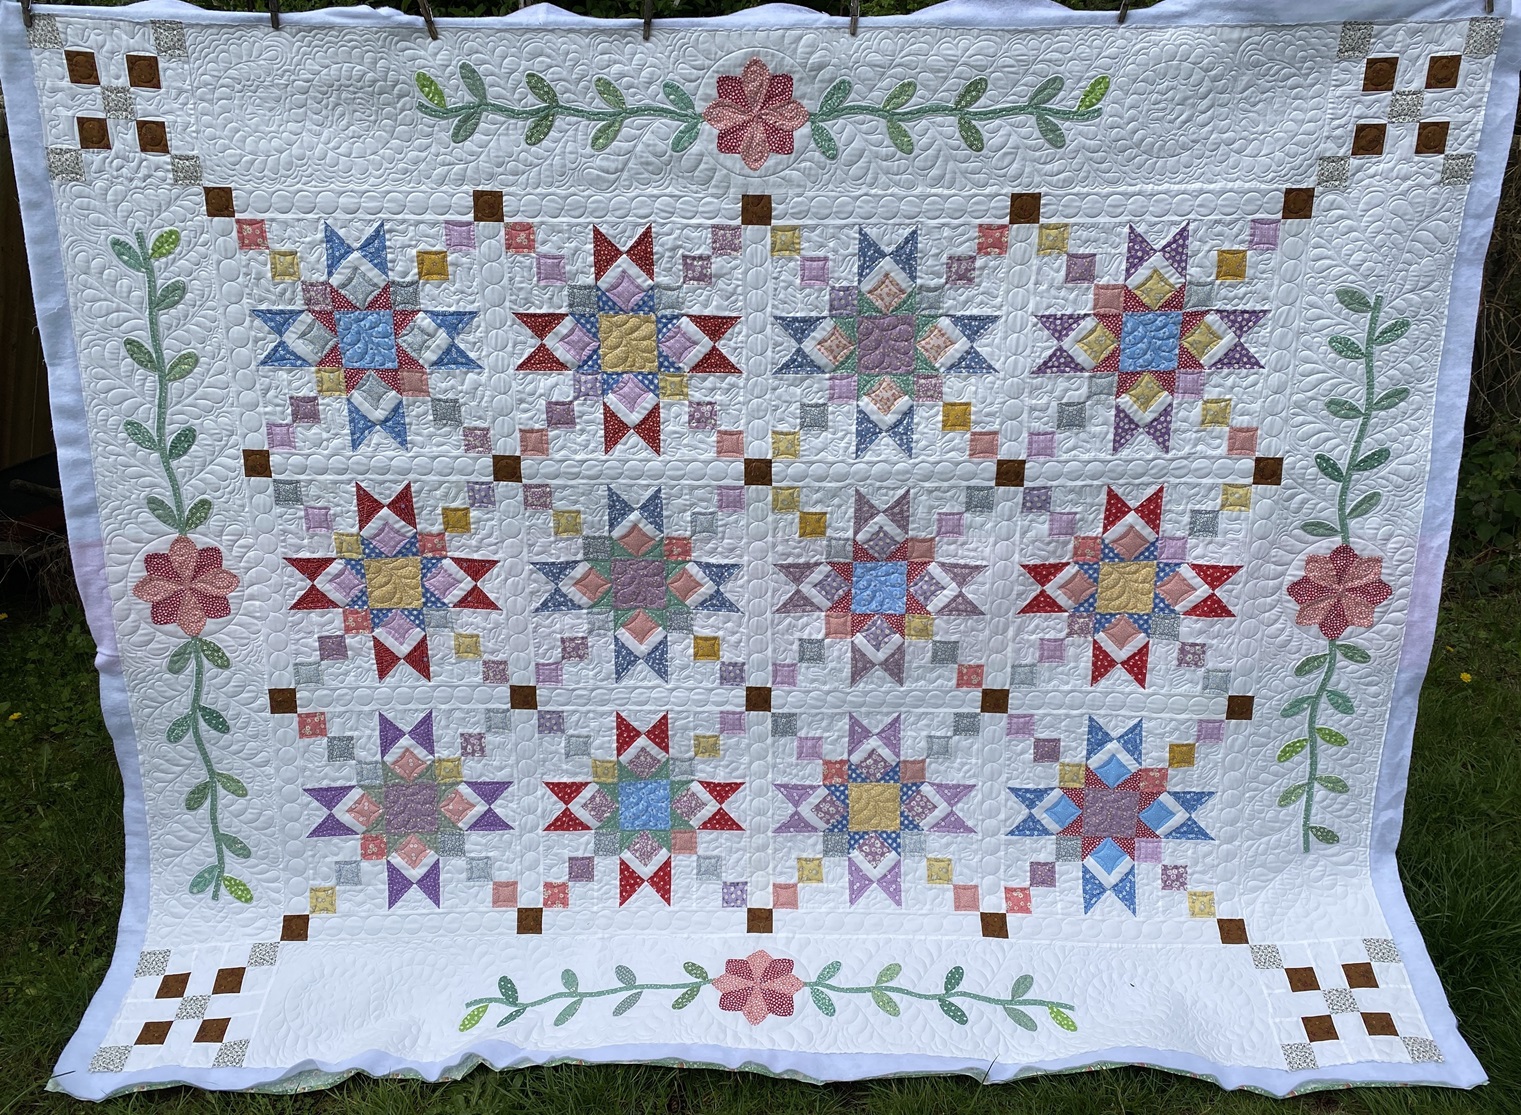
First is the Granny’s Star quilt, pieced by the Evergreen Quilt Guild in Kent, WA. The pattern is from the July / August 2009, Fons & Porter Love of Quilting magazine. (For Love of Quilting back issues Click Here)
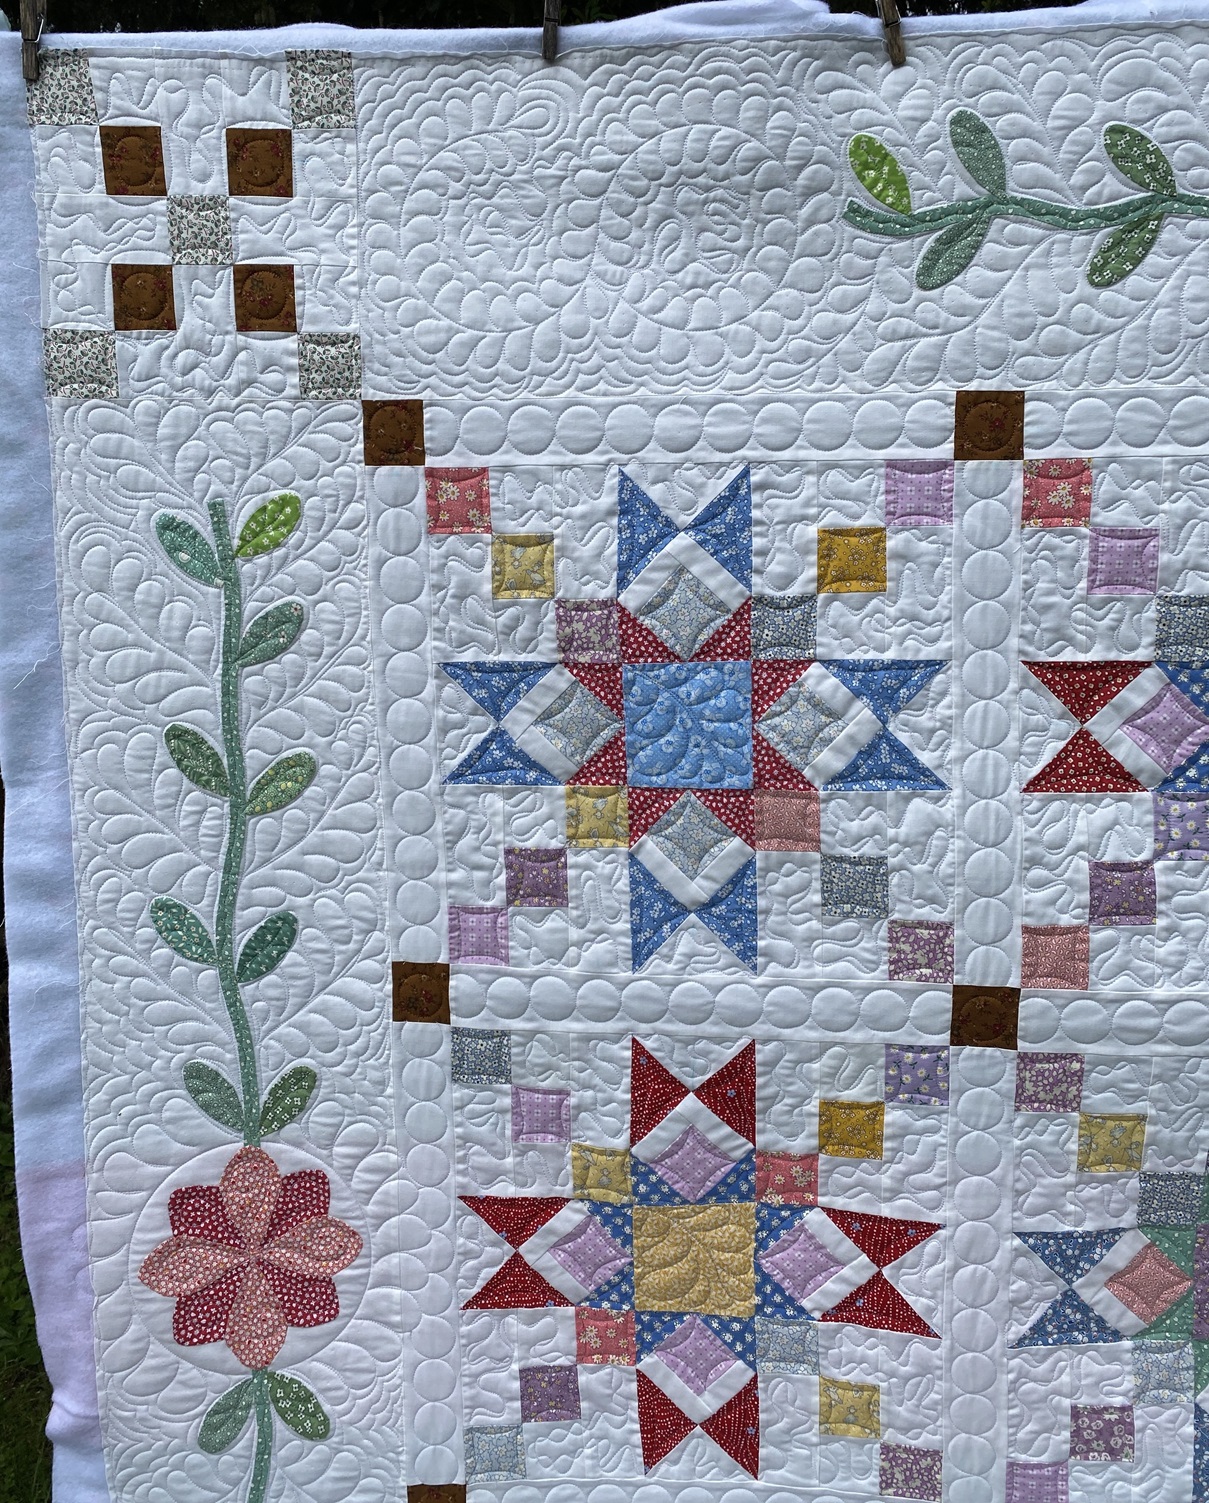
This quilt is all custom quilted with a variety of techniques. I quilted feathers in the borders (which were 10 inches wide!), circles in the sashing and ribbon stipple in the block background and continuous curves in the piecing in the block.
Click on any photo for a larger view.
This is a view of the whole quilt, which measures 78 x 95 inches. The pattern also includes some Yo-Yo’s appliqued on the borders. The batting is Soft & Bright and I used both silver and white high sheen polyester thread.
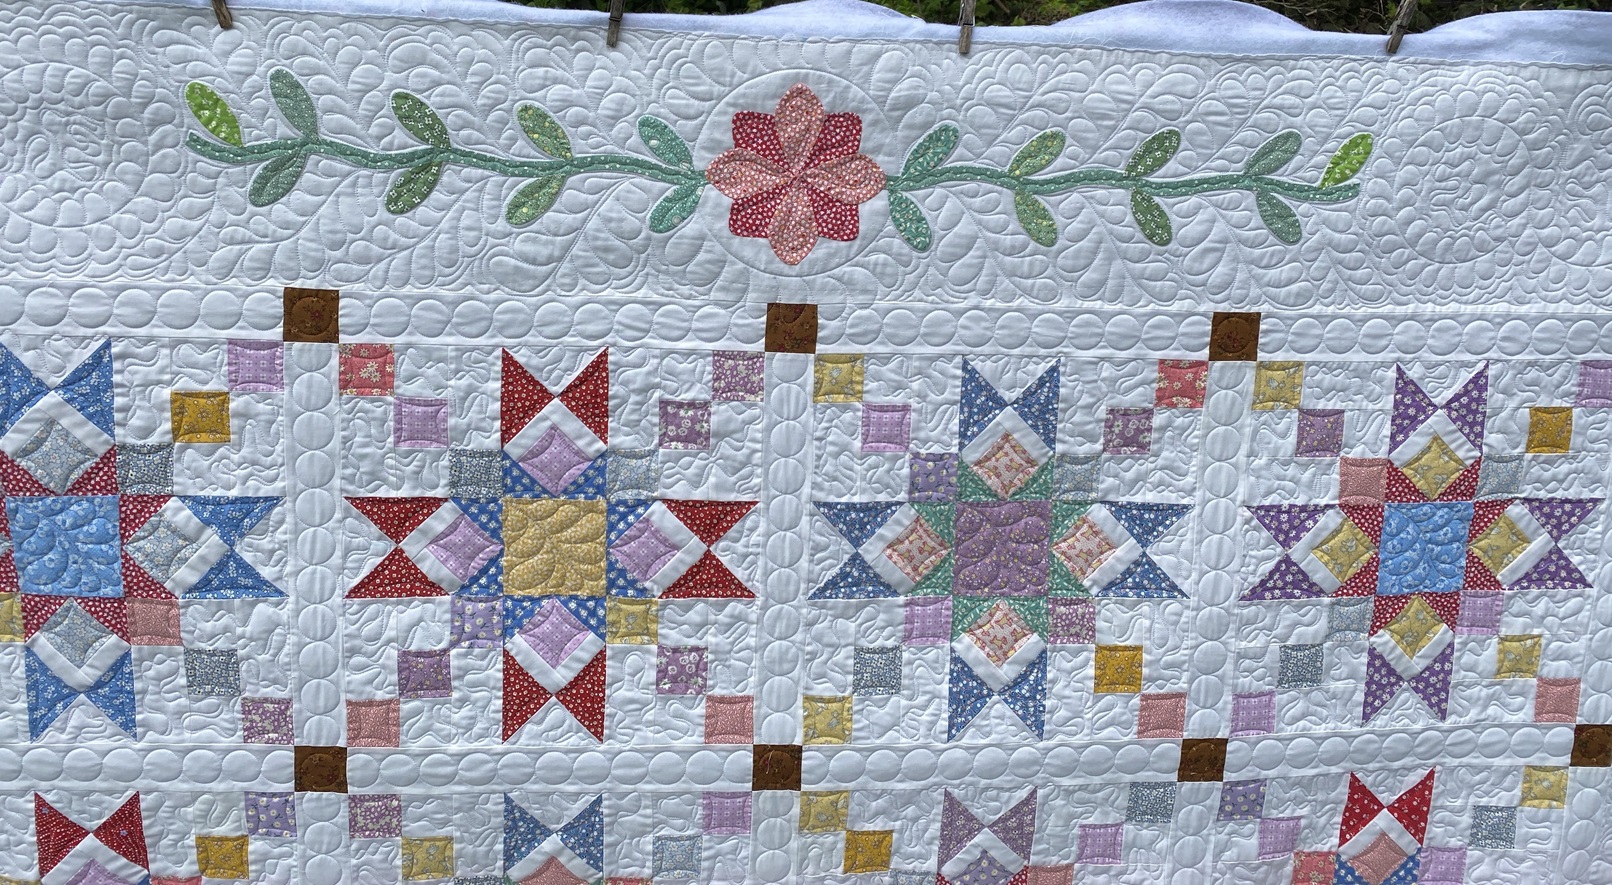
This view shows the feather quilting in the borders.
This view is of the center border and blocks.
I can’t wait to see the finished quilt with the binding and the Yo-Yo’s appliqued in place. I’ll try to get a photo of the finished quit and post it soon!
Here is a totally different quilt from Judie T. It is called Cathedral Beads. It is a free online pattern – For a link to this pattern, Click Here
This quilt was 84 x 94 inches and was perfectly pieced!! The fabrics were “happy fabrics” with lots of color, sparkle and just way to much fun to look at!!
Because of the happy fabrics, I used a combination of ribbon stipple, wavy lines and starburst patterns for the quilting. The batting is Warm & White and I used a light green-ish variegated high sheen poly thread and white high sheen poly thread.
Here is a view of the whole quilt.
When I put the quilt on my quilting machine, I loaded it “horizontally” like it is hanging above, so that I would quilt across it without a lot of starting and stopping. The photo below shows the details of the quilting. There are wavy lines in the sashing and star bursts in the large pieced blocks.
This photo shows the border and the quilting in the side triangles.
Here is how the quilting looks when the quilt is vertical.
Last but not least, here is a photo of the back of the quilt. The texture from the quilting was AMAZING!
When Judie came to pick up her quilt she was so excited!! She couldn’t believe how nice the quilting was and how it made her quilt sparkle!!
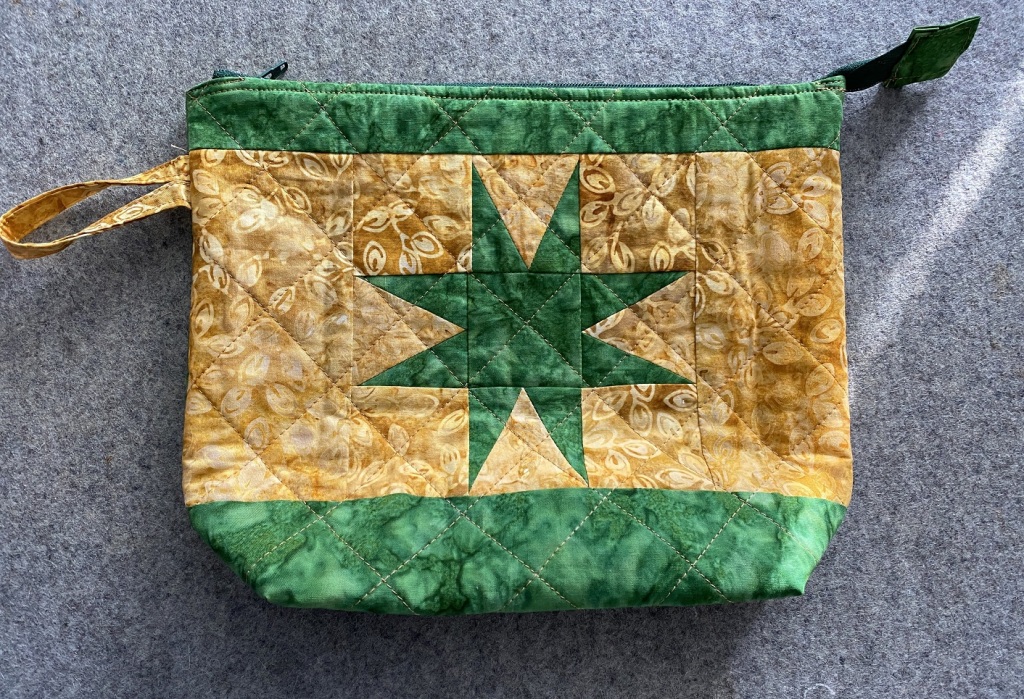
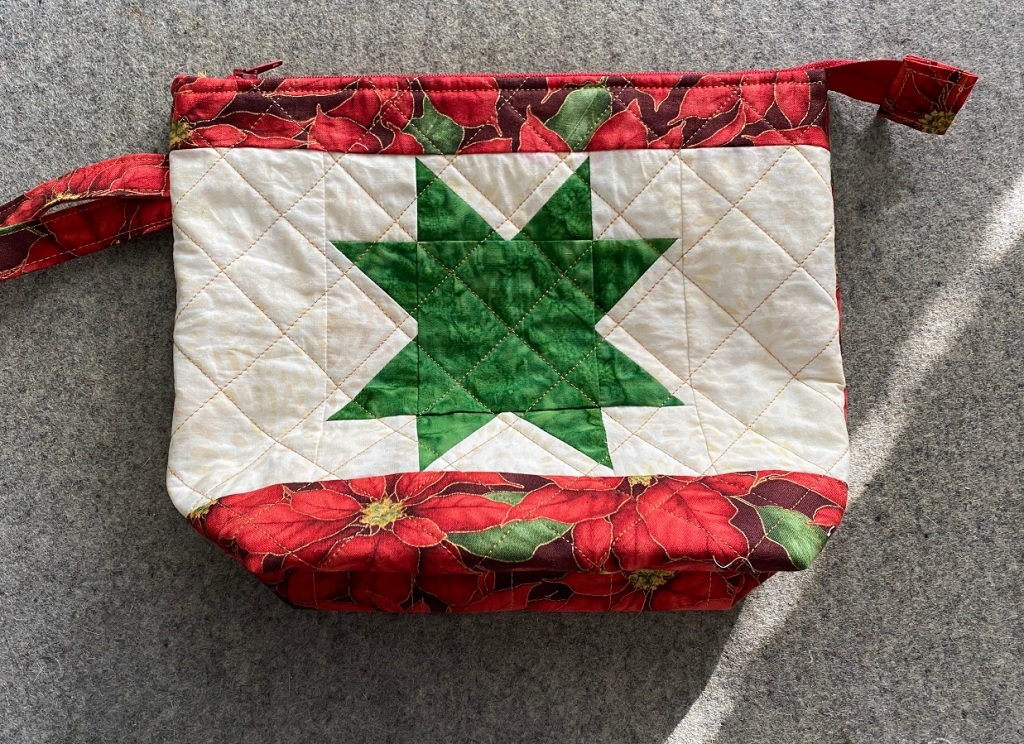
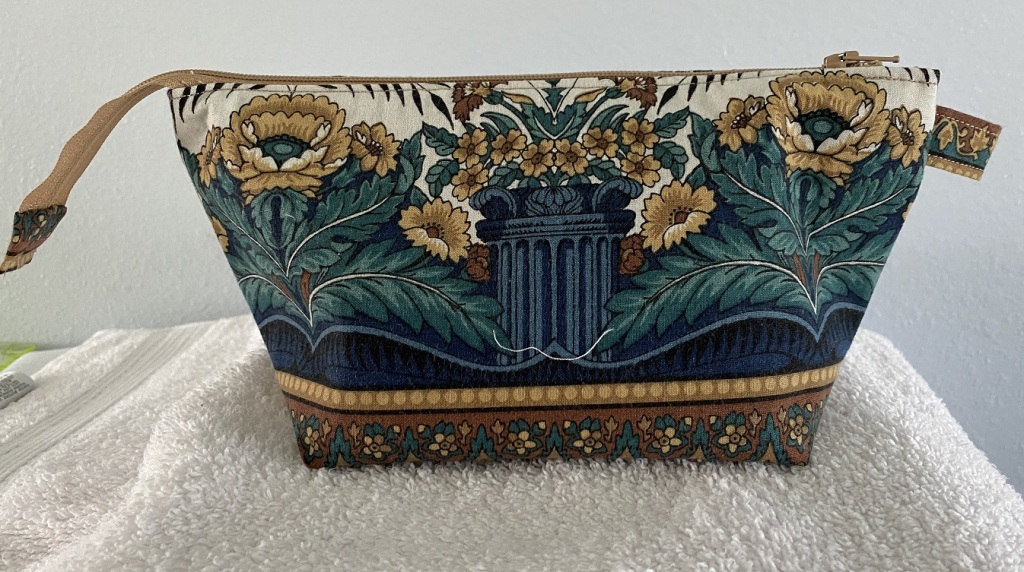
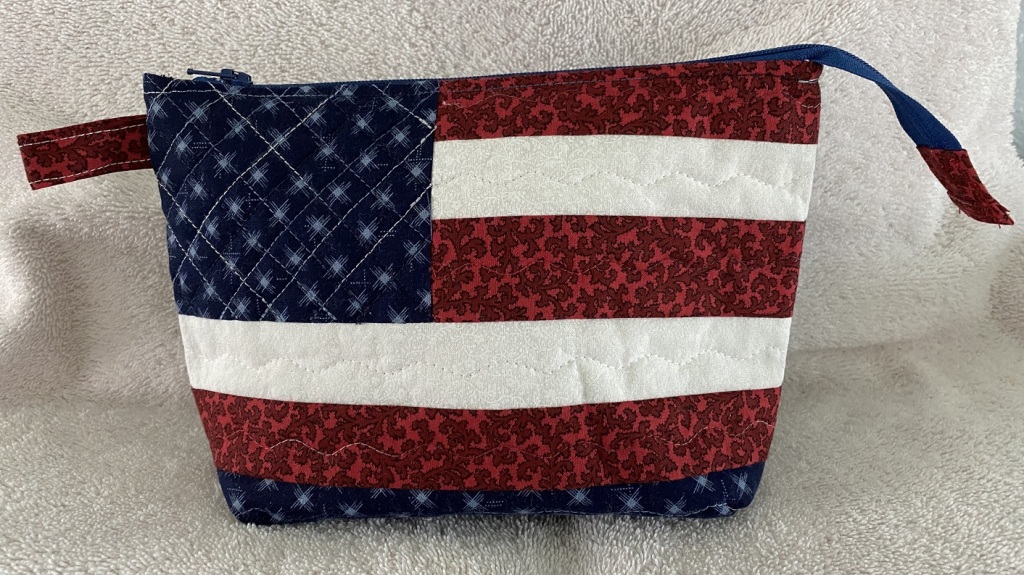
Lately I have been fascinated with making pouches! In particular quilted pouches.
I love working on pouches because they are small – a lot smaller than a queen size quit – they are relatively quick, there is a lot of creativity and they are functional!
Here are some pouches I have made over the last year or so – Click on any photo for a larger view and slide show.
These pouches were SO MUCH FUN to make, even though I quilted them on my home sewing machine – either free motion or with a walking foot. But, I knew there was a way to quilt them on a longarm machine!
You could put a piece of “backing fabric” on the machine and quilt up a bunch of fabric and then cut the quilted fabric to size. But …, when you are sewing up the seams on the pouch, the seams can get VERY bulky and it will make your stitching a bit harder (ask me how I know this!)
By pre-cutting both the pouch fabric and the batting, will make the sewing up of your pouch a LOT easier!
Here is a (hopefully) brief tutorial on how you can quilt the “pouch pieces” on your longarm, using extra backing fabric from a quilt that is already on the machine!
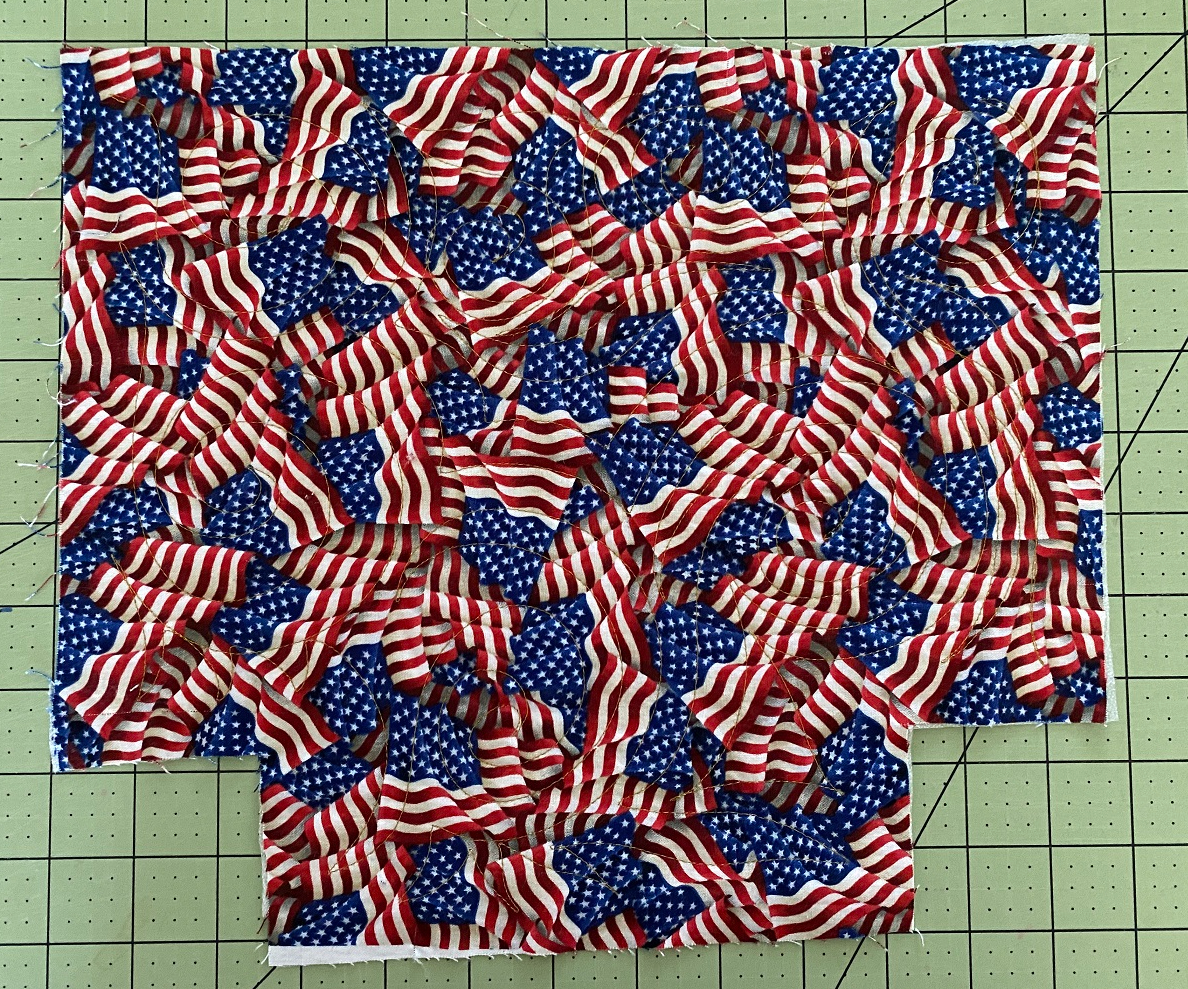
I was working on a quilt and it had really nice Americana fabric on the back. Since this was a quilt for an upcoming class, I had a LOT of extra backing fabric extending from the sides and the bottom of the quilt while the quilt was on the quilting machine. I knew that fabric would make a GREAT pouch or two. Here is what I did.
VERSION 1 – THE BACKING FABRIC WILL BECOME THE FRONT OF THE POUCH
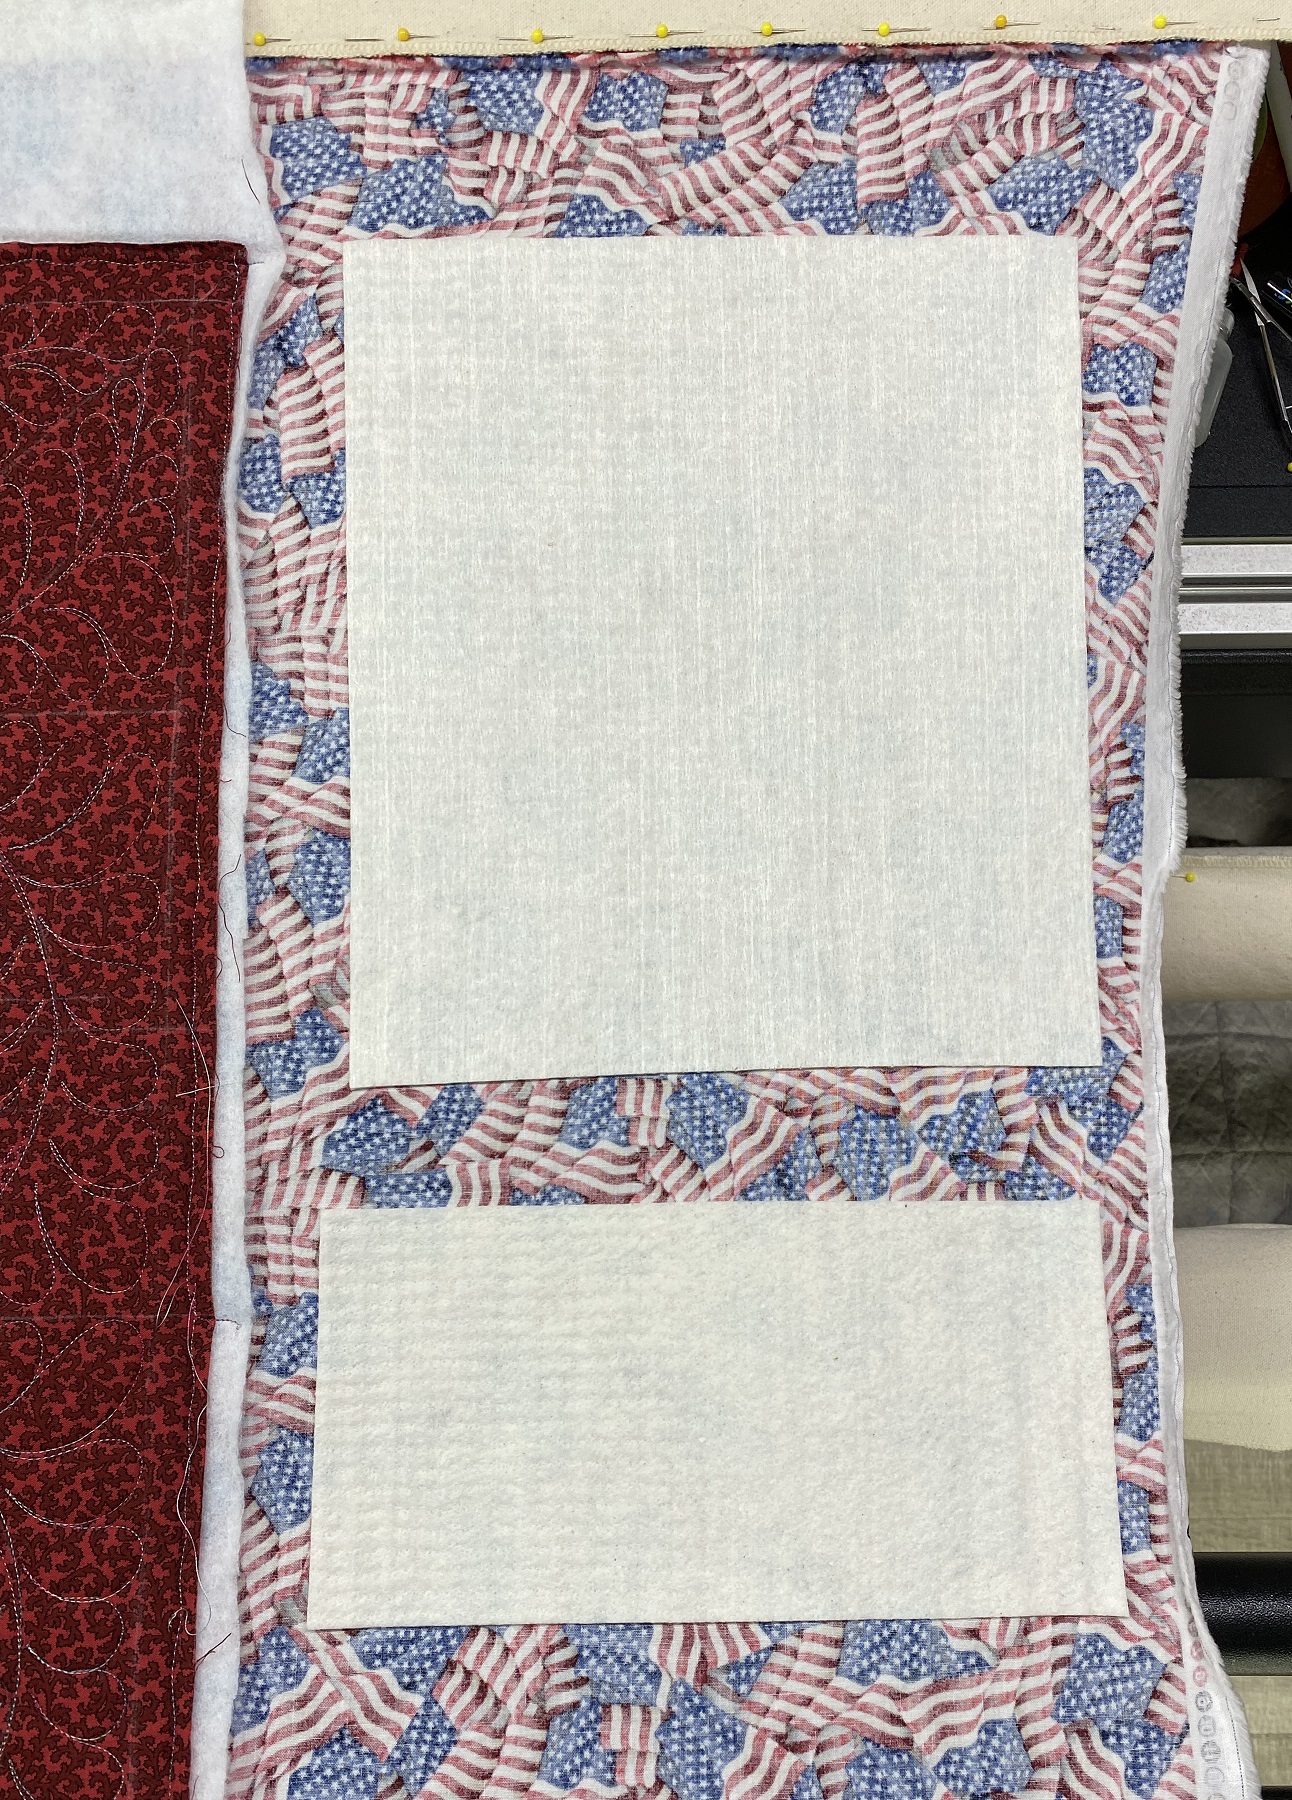
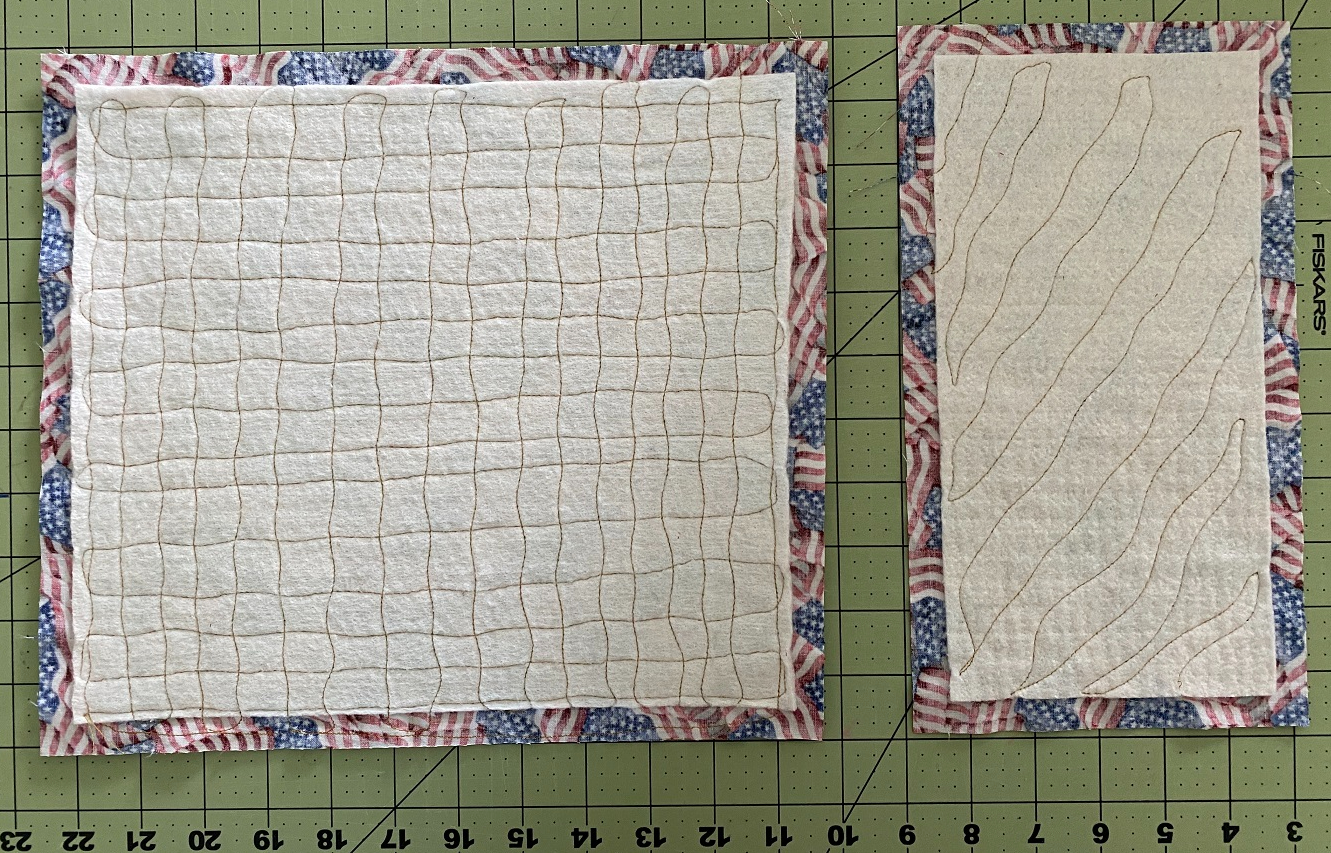
After the quilt was quilted (and the quilt was still on the machine), I determined how much extra backing fabric I had to work with, then cut some batting (I used Warm company, 80/20) to 1 inch less than the size I needed for my finished pouch pieces. I placed the batting pieces on the extended backing fabric having at least 1 or more inches between the batting pieces and used a small “shot” of temporary basting spray to hold my batting in place. When the batting was in place, I quilted it.
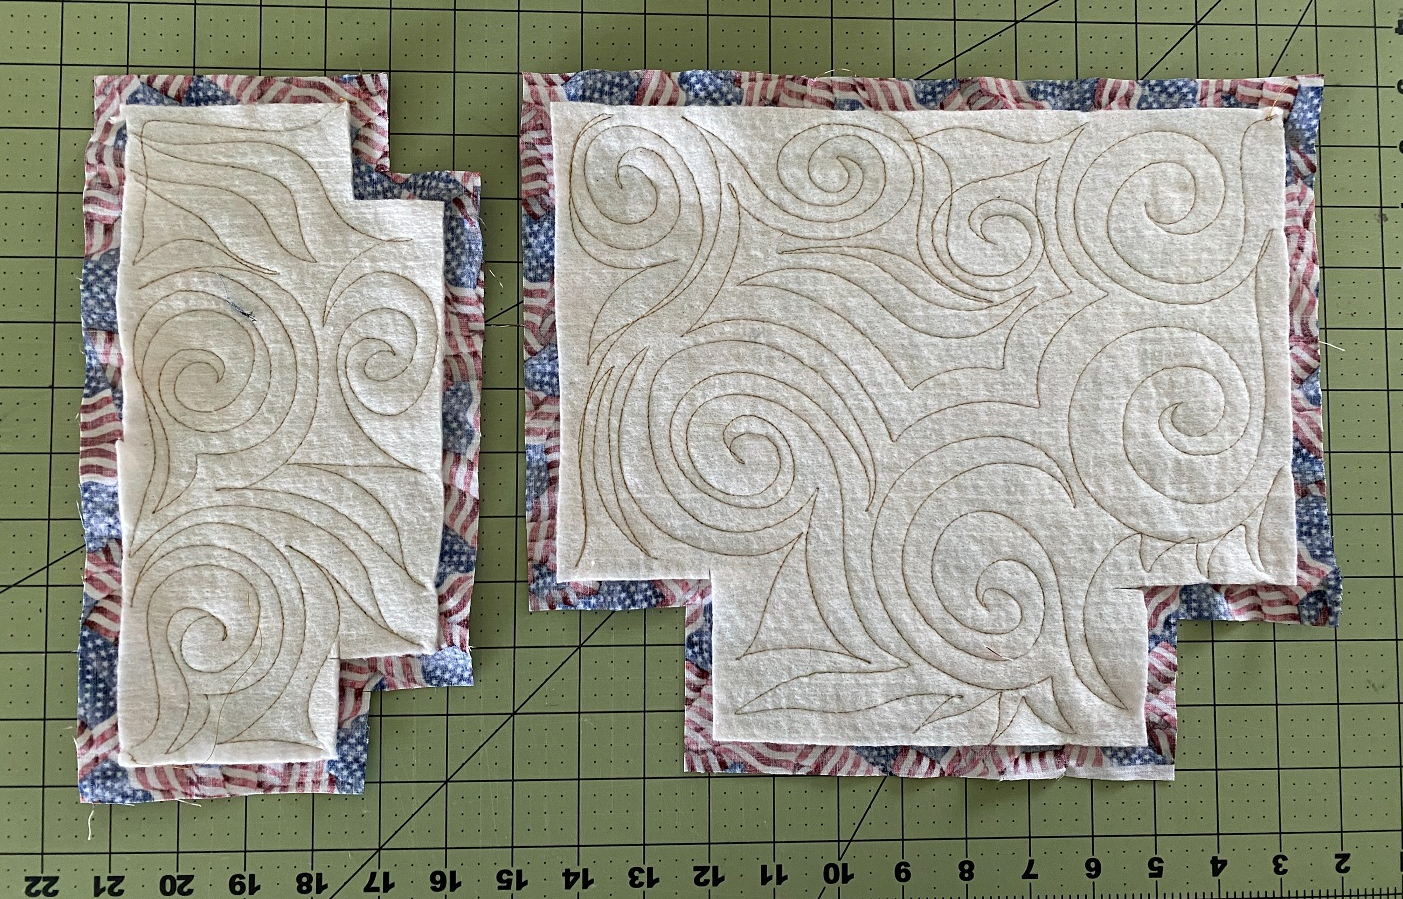
The first photo below show the batting cut for a larger pouch AND a small pouch, in position for quilting, on the left edge of the backing fabric. The second photo shows the quilting. The third and fourth photos show the batting placement and quilting on the right edge of the quilt backing.
Click on the photos for a larger view and slide show.
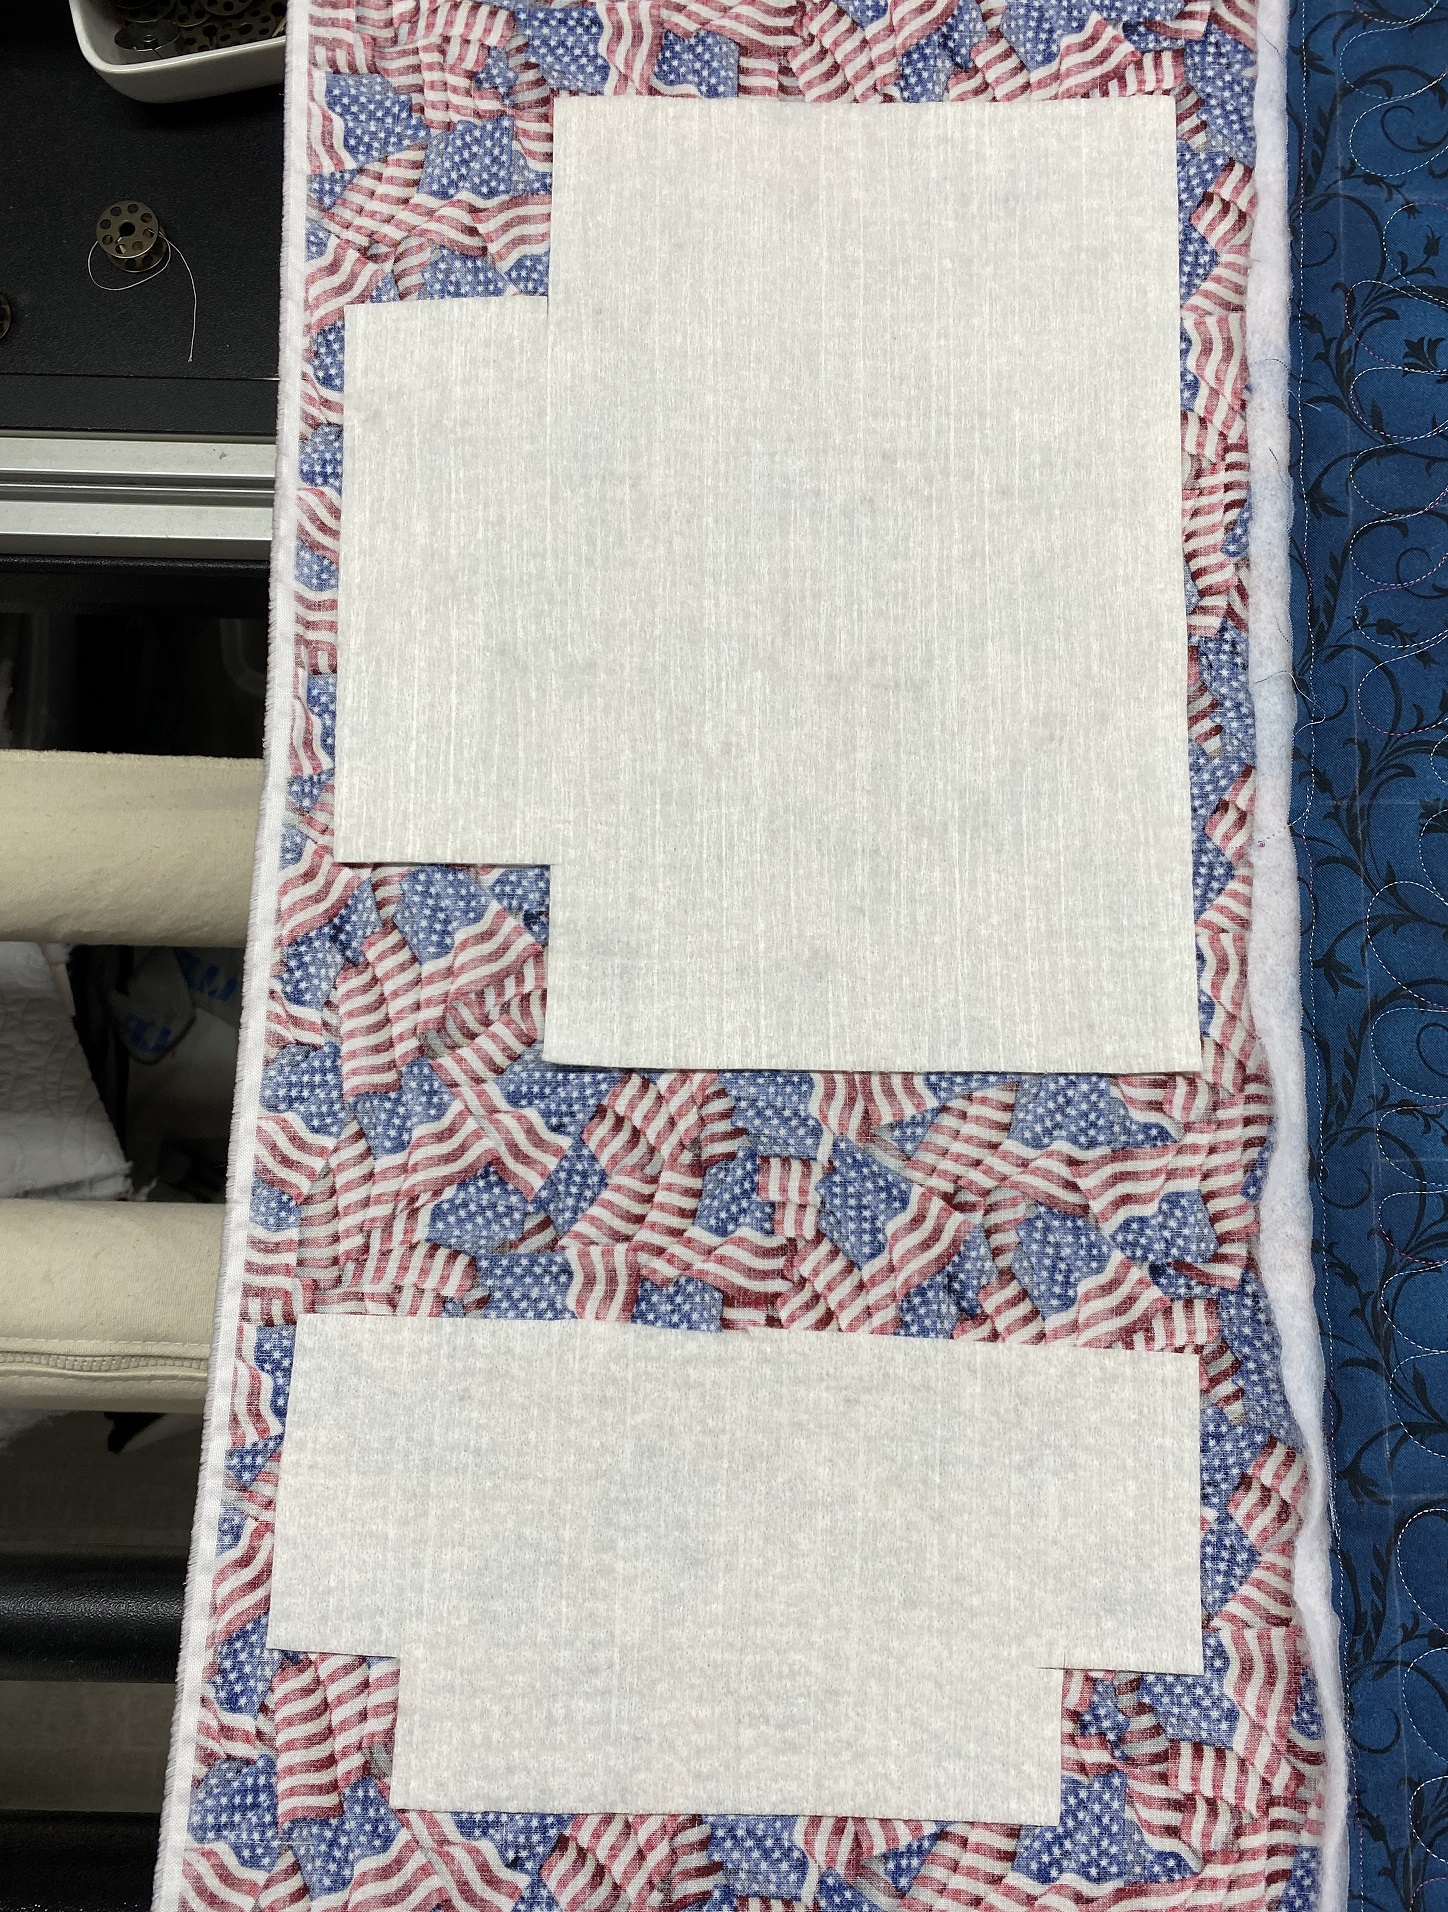
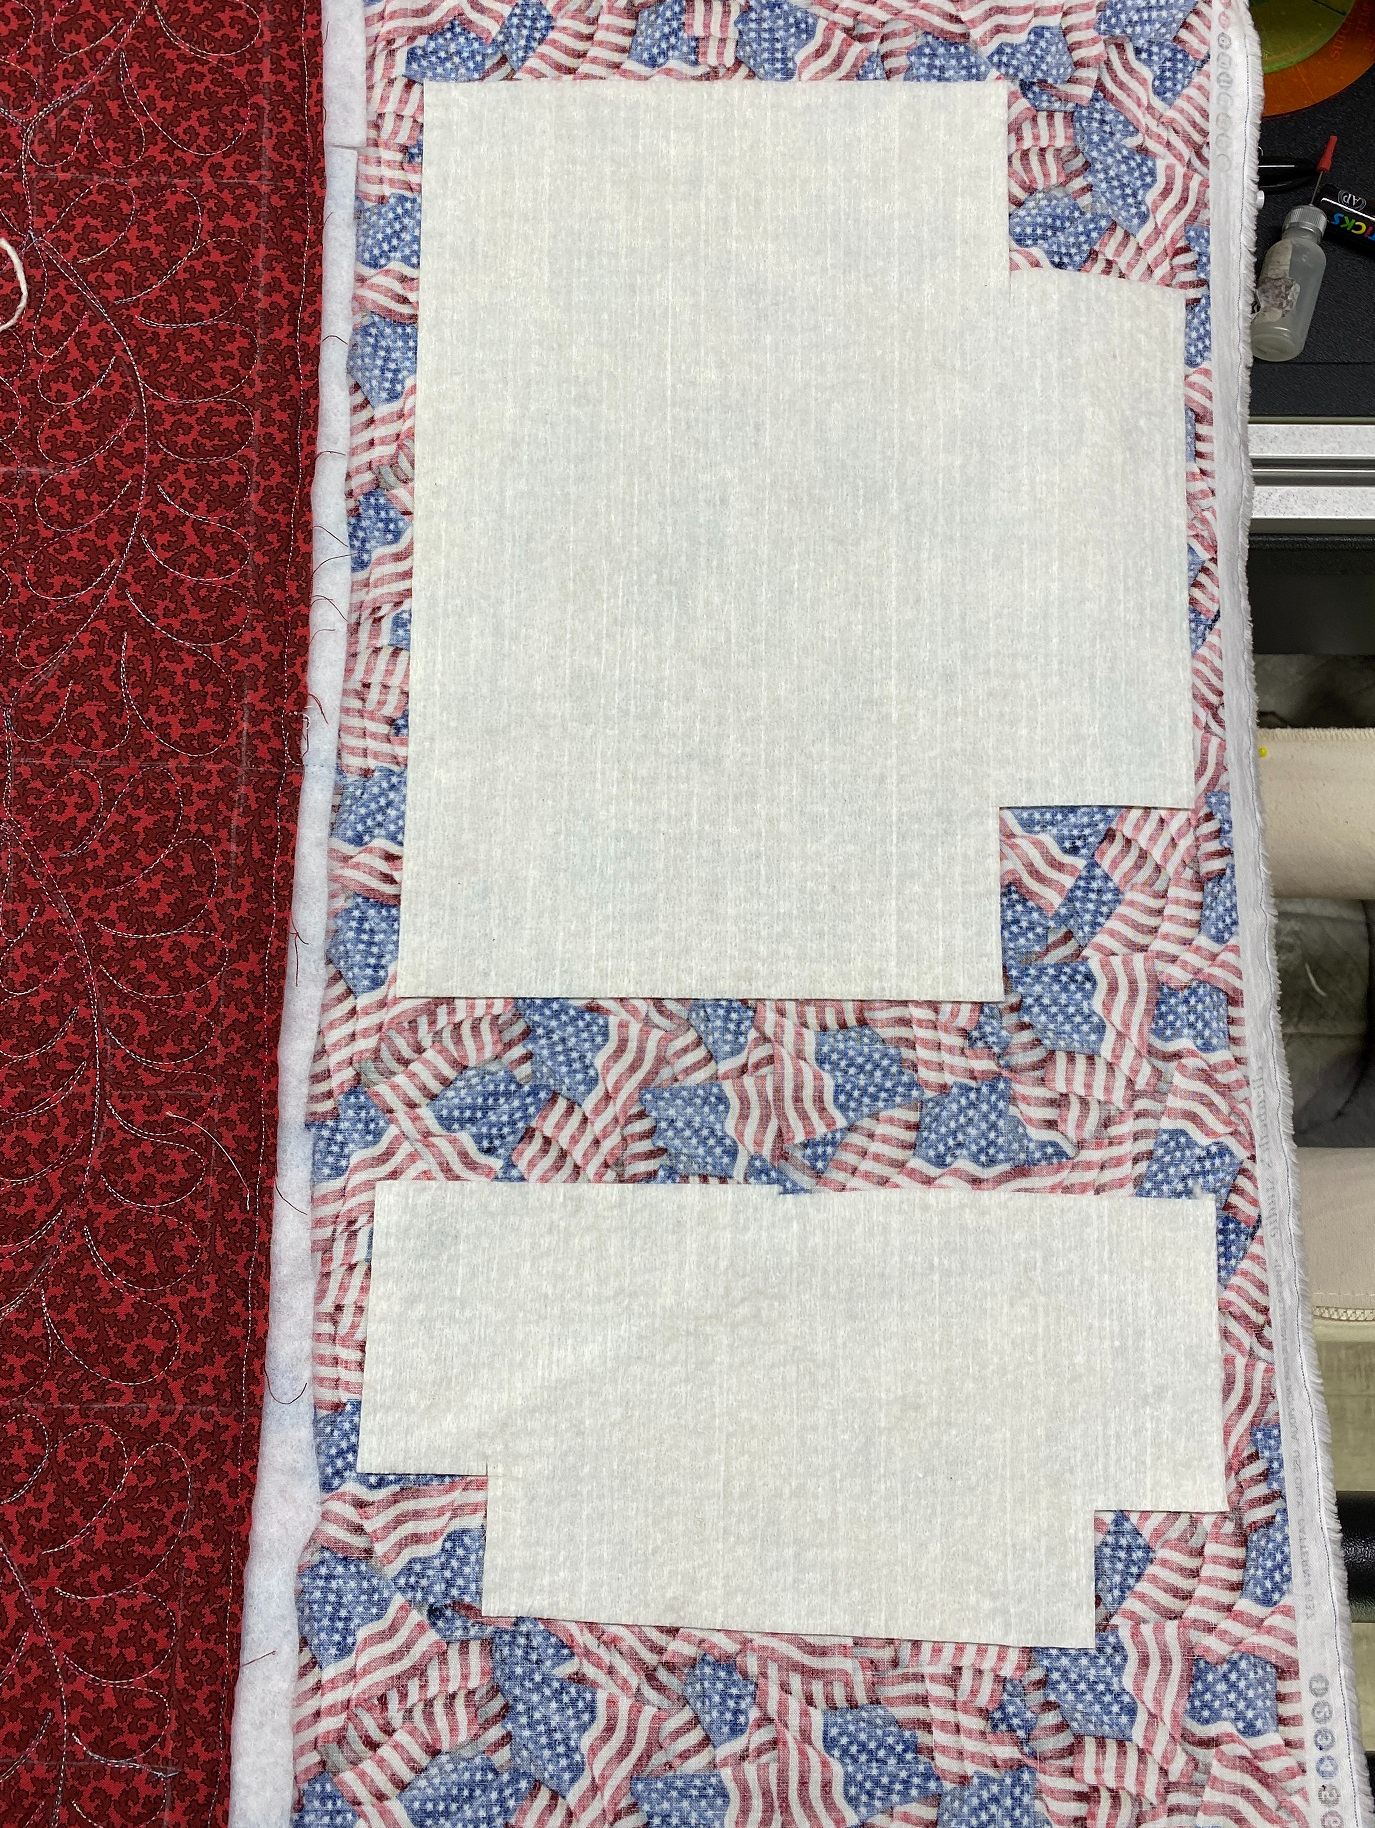
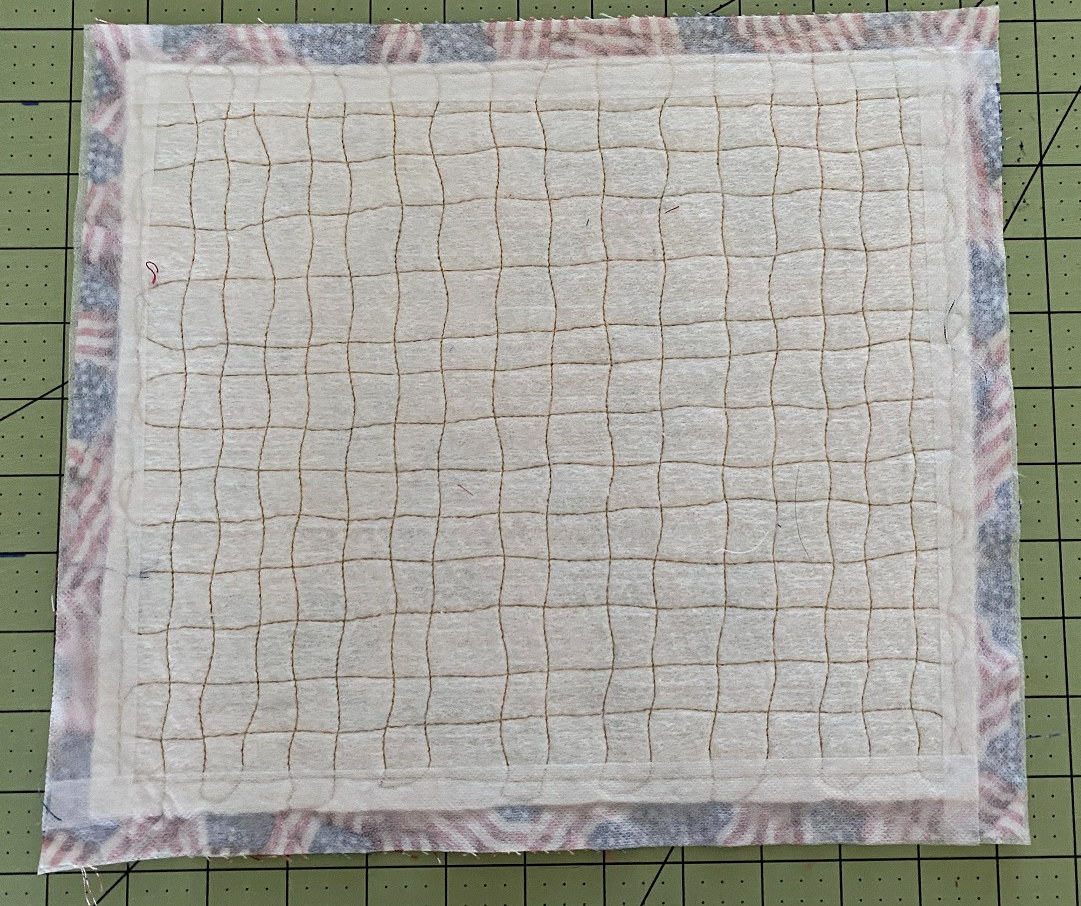
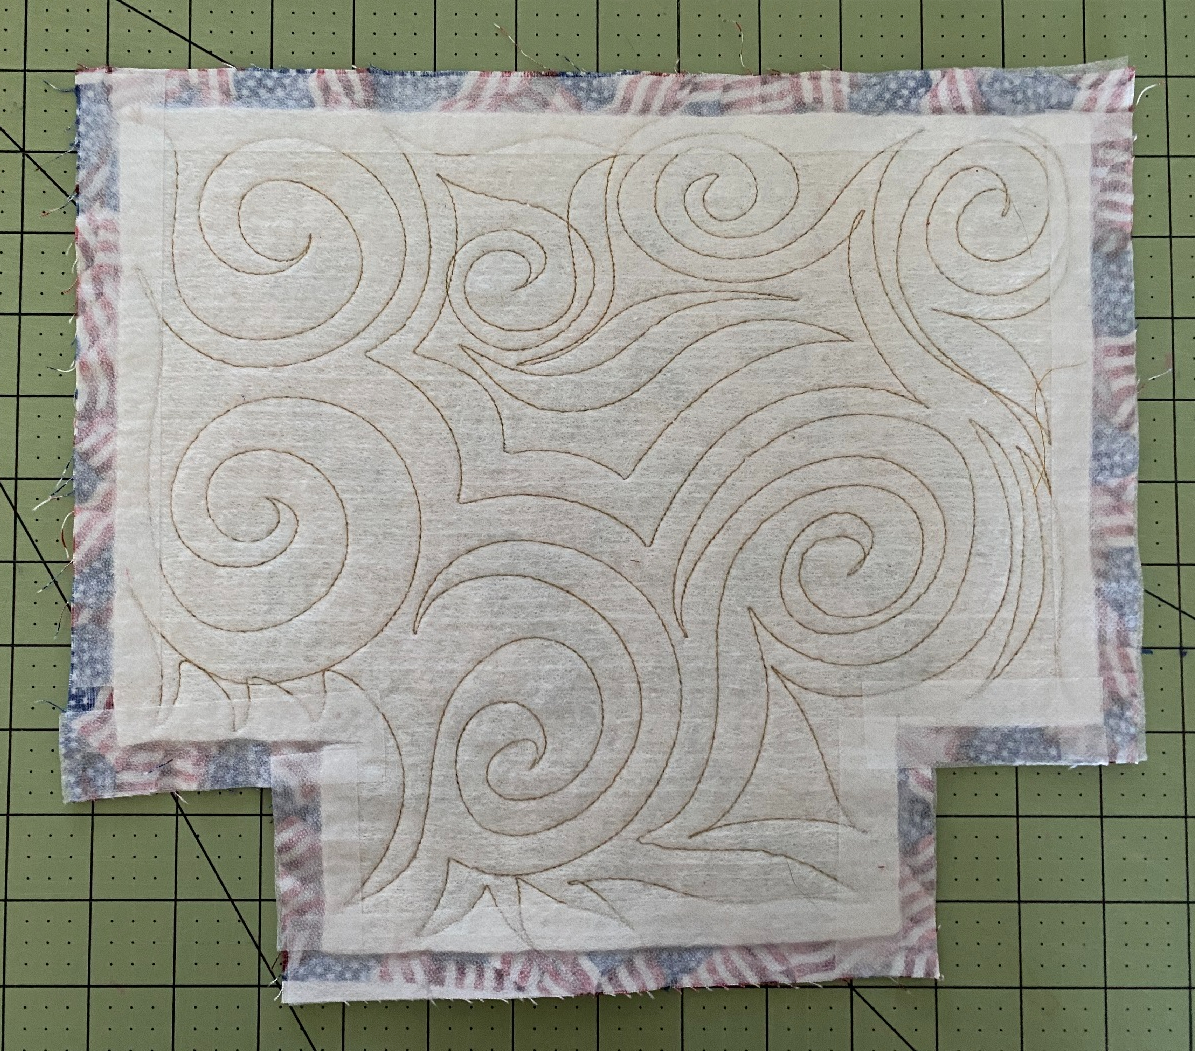
If you would like to make a “boxed bottom” pouch, you can cut your batting that way, too. The photos below show a large and small pouch pieces, in position, ready for quilting on both the left and right edges of the backing fabric.
Once the batting pieces are all quilted, remove the quilt, trim it, and then cut apart the pouch pieces leaving a 1/2 inch “border” around all the edges of the batting. This 1/2 in area will be the seam allowances when you are sewing your pouch!
You could start sewing your pouch together right now, but, I like to take one more step, especially with the “batting only” version.
Take some lightweight fusible interfacing (it doesn’t matter what kind) and cut it into 1 inch strips. Fuse these strips to the edges of the backing / batting pieces. The interfacing will hold the edges of the batting when you are sewing, which will make your life so much easier. Do this on ALL the edges of the pouch pieces.
The first photo below shows the strips of interfacing in position before fusing. The second photo is a close up after being fused.
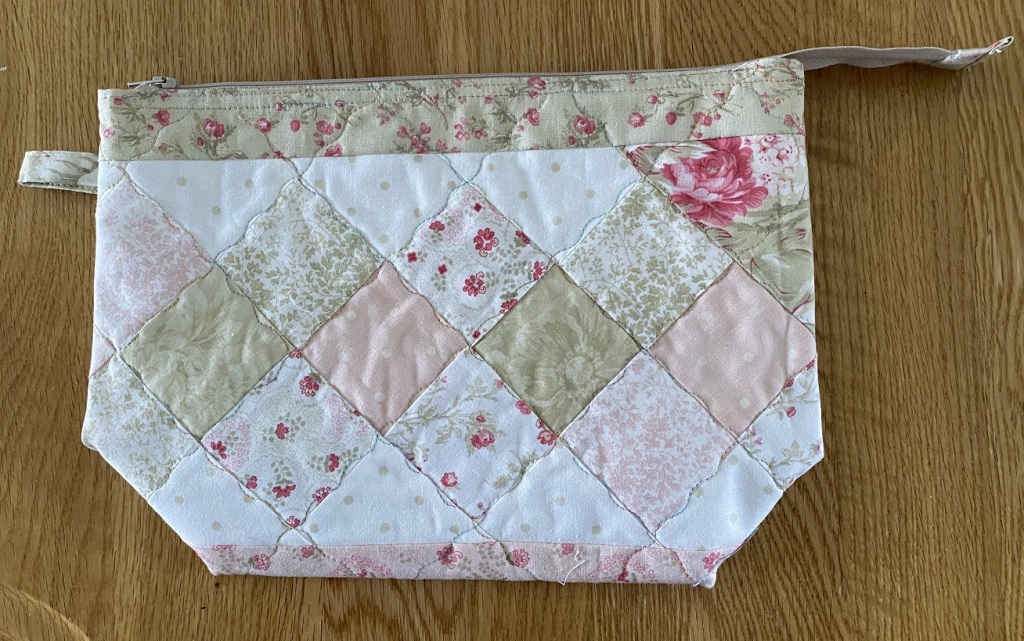
Here are my pouch pieces all quilted, edges fused and ready to be made into a real pouch.
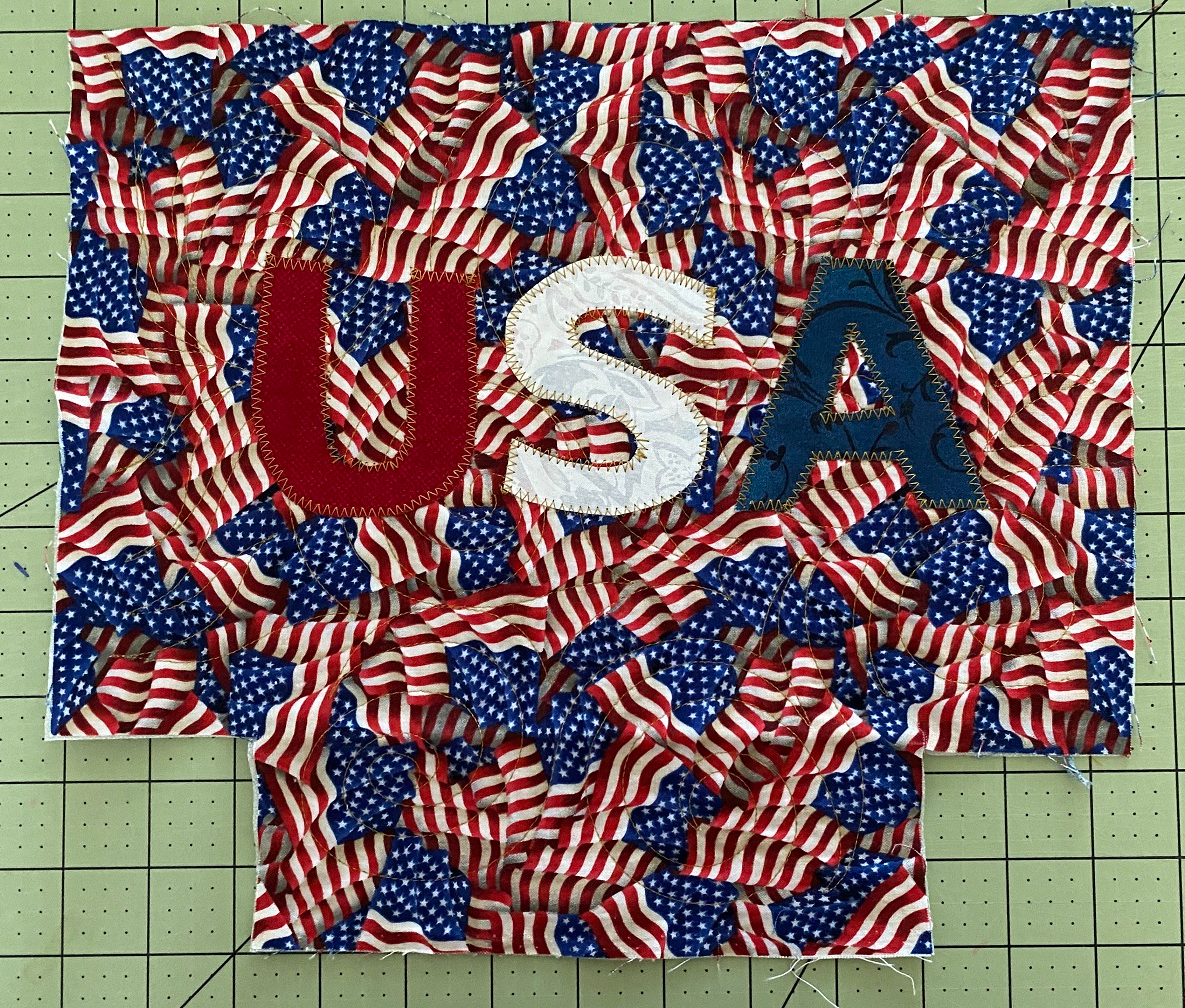
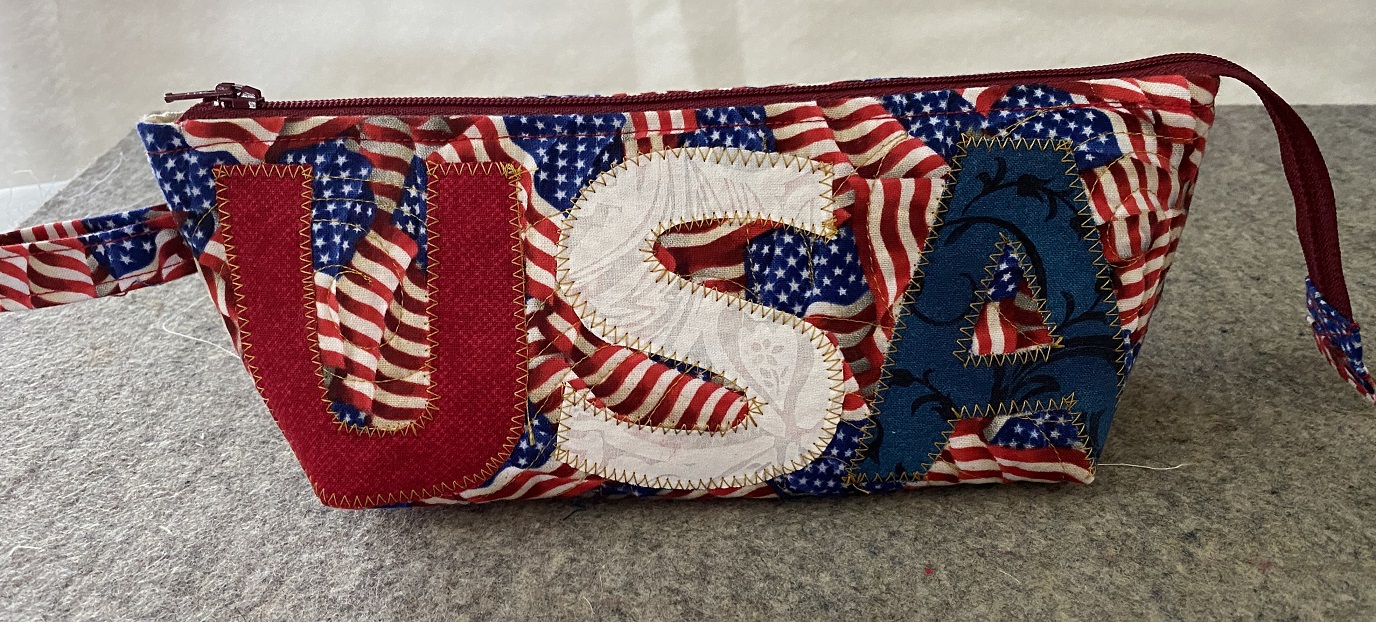
But wait, there’s more! There is WAY too much “open” space on the front of these pieces. So, I found an online applique alphabet and did some simple applique to make –
And here are the finished pouches!
There are more versions of the quilted pouches, but that will have to wait for another day.
Here are some resources for the instructions on making the pouches –
For my favorite way of making a zippered pouch Click Here
For another way to make a zippered pouch and to finish the inside Click Here
Here is information on an acrylic template to make boxed pouch bottoms Click Here Note – I do have this template and use it.
There are MANY, MANY tutorials, blog post and videos on how to make pouches. Do an internet search and find one that YOU like!
Hopefully you will be able to make these cute, fun and functional pouches with your “longarm leftovers!”
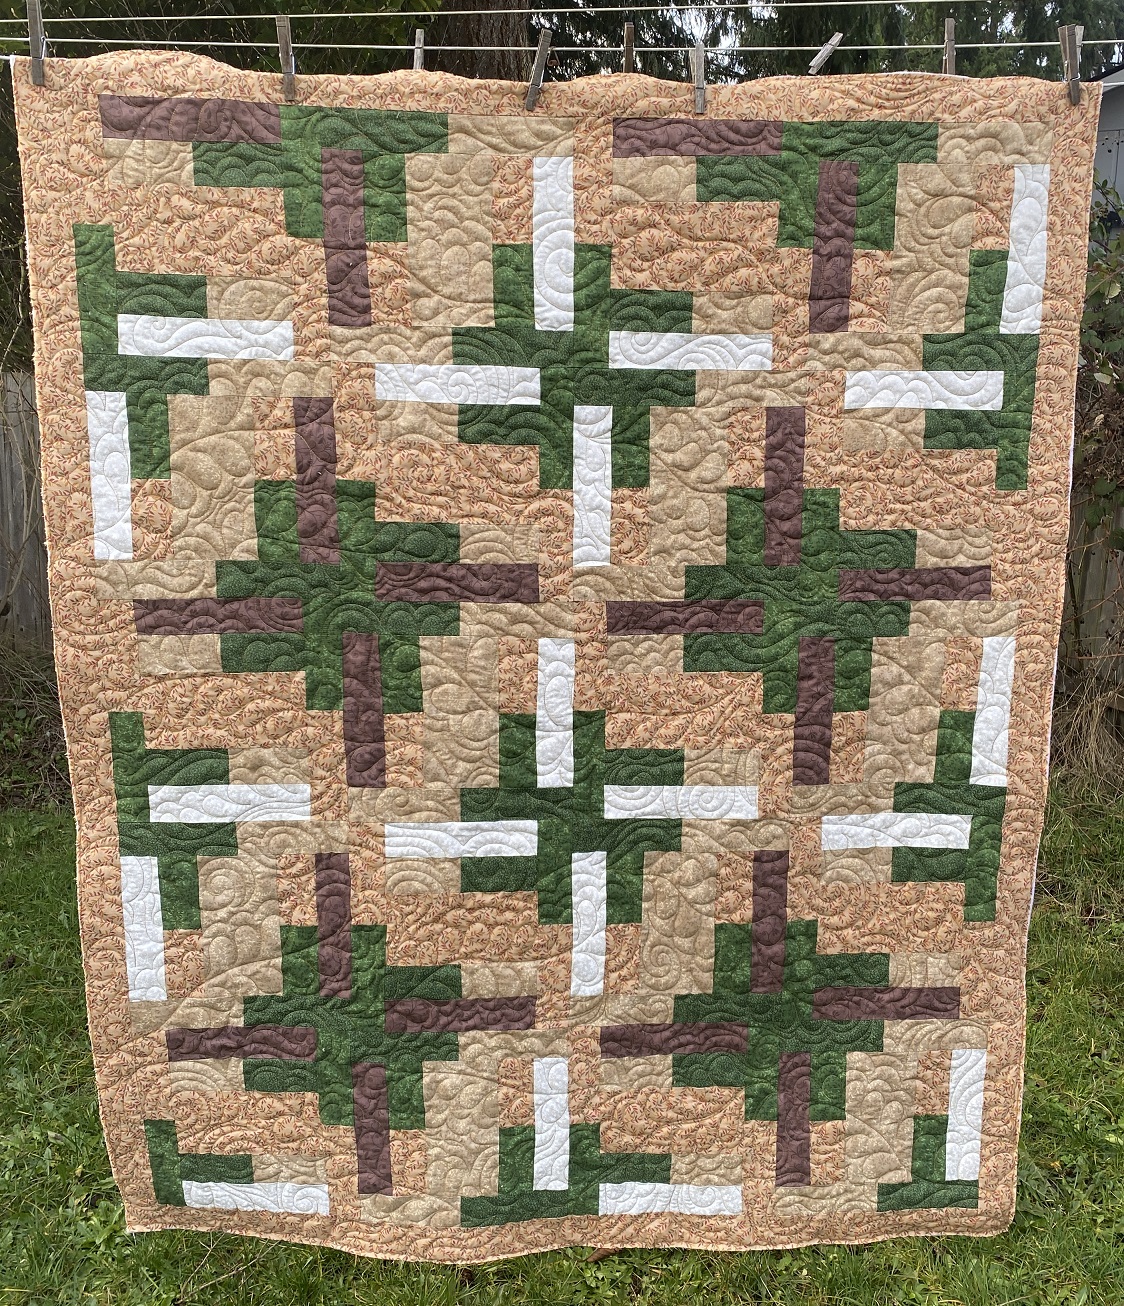
In January I quilted this quilt for Connie M. The piecing pattern is called “Mosaic” and it from the book “Fat Quarter Style” published by It’s Sew Emma
Connie’s quilt was impeccably pieced and it was a joy to quilt. I used a free hand pattern called “Gentle Waves.” I have used that pattern on other quilts Connie had pieced and she requested it for this quilt.
I used Soft & Bright batting (Warm Company) and high sheen polyester thread.
For a video on how to quilt the Gentle Waves patternClick Here
Click on the photos for a larger view.
Connie donated this quilt to Hopewell House in Portland, OR. Hopewell House is the only freestanding inpatient hospice in the Pacific Northwest, dedicated to serving the dying and their families.
Here is an email I received from Connie (posted with her permission) –
This last quilt (above photos) that you worked on for me was destined for Hopewell House, which is an end-of-life hospice residence near me. Your longarm quilting on this piece is such a beautiful example of the love and artistry that you invest in every piece. So I wanted to share with you the email that I just received from Hopewell House, about “our quilt”. Thank you Cindy for adding your special touch to every piece that I send you. . . . Connie
Here is what Hopewell House sent to her –
Connie, I feel compelled to let you know that your quilt was chosen by a resident just days after you dropped it off . We have received many beautiful quilts, but yours truly stood out as particularly special! It provided cheer and comfort to the resident and her family during their time at Hopewell. The resident has since passed, and the quilt was taken home by the family to treasure. I just wanted to share this, to highlight how appreciated your work and donation is! With gratitude,
To know that something I have helped to create was a blessing and a joy to both the hospice patient and the grieving family, makes my quilting so very worthwhile and appreciated!
Thank you Connie for letting me quilt your wonderful quilts and many thanks toHopewell House for all you do!
Oh my goodness! It has been a while since I last posted on my blog!!! Life has been busy and I finally have some time to catch up on things, including blog posts!
I actually have been working on some customer quilts and here are some photos of my most recent quilt.
This quilt was made by Cynthia H for her granddaughter. She did a great job with the piecing and we decided on free hand feathers and swirls for the quilting.
The quilt is 51 x 62 inches, it has Soft & Bright batting and I used Signature, Golden Harvest variegated cotton thread for the quilting. The backing is a very plush Minkee!
Click on the photos for a slideshow and a larger view.
Thank you Cynthia for letting me work on your quilt. I know your grand daughter will love it!
At the start of the Covid pandemic I posted instructions on how to make face masks. I thought that would be the ONLY face mask tutorial I would ever have to do. But …., as time goes on and Covid “does it’s thing,” things change and we will probably be wearing face masks for a LONG time yet to come!
At least the kids are able to go back to in person school, wearing a mask of course! And my grandkids are no different! Again, I have been making masks for them, for myself (we all need a new wardrobe every once in a while, even if it is face masks!) and for other adults.
Over the last year and a half, I have found a new way to make face masks, which, IMHO, is far better than what I showed before.
A friend of mine posted this video on FaceBook, I watched it, made a mask or two, and tweaked the pattern a bit.
Here are my “tweaked” instructions on how to make this mask.
Fabric – 1/4 yard of printed fabric will make at least one, probably two, adult size masks and 1/4 yard of lining fabric. I used washed muslin for the lining.
We will talk about the ties in a little bit. I have a variation which works really well.
Here is the pattern, which is just a tad different than the pattern in the video.
Click on any photo for a larger view. Click on the text at the bottom of the photo and the photos will scroll.
Adult size pattern
Child size pattern
For child size instructions, see the bottom of this post.
Cut one pattern of the printed fabric and one pattern of the lining fabric.
Place right sides together and stitch around all sides, leaving an opening at the bottom. Turn right side out and press well. Top stitch around all sides, stitching across the bottom (formerly open) area. Your mask should look like the photo below left.
Insert Nose Bar – Lay your nose bar at the top of your mask and mark / note how much space you need for it.
Mask is stitched, turned, pressed and top stitched
Measure for nose bar
Turn the mask to the wrong side and stitch a line across the top to make a casing for the nose piece. The casing I made for my nose bar was between 1/2 inch and 5/8 inch wide.
Make a small cut in the lining fabric ONLY and insert the nose bar into the casing.
After the nose bar has been inserted and centered, stitch the ends of the casing closed.
Lay the face mask, wrong side up on the ironing board. Fold the top and bottom edges towards the middle having a 2 inch “flap” of the right side of the face mask at the top and bottom. The “middle” of the face mask is about 2-3/4 – 3 inches wide. See photo lower left. Your face mask now looks sort of like a burrito! See photo lower right
Measure and press on both sides
Pressed mask
Stitch along the folds at the top and bottom of the middle section, about 1/8 inch away from the fold. It doesn’t matter if you stitch from the right or the wrong side, as long as these folds are stitched into place. (Note – the stitching is not shown in the photos above. )
Here is where things get interesting.
Step 1 – Move the bottom flap out of the way. Place a ruler so that it is 1 inch from the side edge. If desired, draw a line with your marker of choice.
Step 2 – Fold the flap UP so that the edge of the flap is even with the middle stitched line. Keep the ruler in place. See middle photo.
Step 3 – Bring the diagonal fold to the edge of the ruler and pin in place. This is going to “twist” the fabric and you will think you are doing something wrong. This is correct!
Step 1
Step 2
Step 3
Now we are going to repeat this on the other flap
Step 4 – Fold the remaining flap UP and place the ruler 1 inch from the side edge
Step 5 – Fold the flap DOWN so that the edge of the flap is even with the middle stitched line. Keep the ruler in place.
Step 6 – Bring the diagonal fold to the edge of the ruler and pin in place. This is going to feel really wonky, but it is the way it is supposed to be!
Step 4
Step 5
Step 6
Step 7 – Take the mask to the sewing machine and stitch along the side pinned edges. See photo below left. I like to start my stitching at the top edge, backstitch, stitch along the fold, go across the “plain” fabric, then continue stitching along the bottom fold, backstitching at the start and end of the folds.
Now turn the mask 180 degrees and do Steps 1 – 7 on the other side of the mask.
When finished folding and stitching the other side of the mask, the inside of the mask will look like the middle photo and the outside of the mask will look like the photos at the right.
Step 7
Inside of the mask
Outside of the mask
The body of the face mask is completed, now we have to work on the ties.
I have seen many different ways to put the ties onto a face mask, all of which don’t seem to fit well or need a lot of adjusting. I have found a different – and much easier – way of putting ties on the mask, and it makes wearing the mask a LOT easier.
I do have to give credit to my sister, Sharon for showing me this a while back.
I have been making fabric ties from 2 inch strips of fabric (cut from selvedge to selvedge). One strip of fabric 36 – 40+ inches x 2 inches wide, will be enough for 1 face mask
Fold the tie in half lengthwise, wrong sides together and press. Open the tie and press one side to almost the middle (pressed) line and press. Repeat for the other side.
Now fold the tie in half again – no raw edges are showing – and press. Stitch close to the double folded edge. I like to use a three step zig zag stitch, but a straight stitch will work just as well.
Pressed, ready for folding
Folded, ready for stitching
I am assuming that you have a folded and stitched tie that is at least 36 – 40 inches long.
From this cut 2 – 4 inch pieces and cut the remaining piece in half. You will now have 4 cut pieces of the tie.
Take one of the short ties, fold it half, and snuggle it between the bottom outer side folds on the mask. Note – the mask edge with the nose bar is the TOP of the mask. Stitch in place, backstitching at the beginning and end of the tie. See photo lower left. The middle photo shows the loop that is made with the folded tie.
Take the long tie and snuggle it between the TOP outer side folds of the mask. Stitch in place, backstitching at the beginning and end of the tie. See photo lower right. Repeat on the other side of the mask with the remaining ties.
The short tie stitched in place.
The loop made with the short tie.
Long tie stitched in place
Take the long, upper tie and put it through the lower (tie) loop as shown below left. Repeat for the other side.
Take (cut) ends of the long ties put them through a “barrel lock.” Here is a source for all sorts of these “locks” and all sorts of other wonderful things. You can get these locks at Strapworks.com For a direct link to the barrel locks I used Click Here (Note – these barrel locks come in all sorts of colors!)
Sometimes it can get a little fiddly to get the ties through the barrel lock. I will use a plier to hold the lock open and then push the tie through the opening.
The photo below right shows the ties through the barrel lock. After the ties are through the barrel lock I like to tie a knot at the end of the tie.
The long tie through the bottom loop.
Barrel lock
Long tie through the barrel lock.
Now your face mask is finished. But wait, there is more!!!!
I really don’t like making the fabric ties and I kept thinking there has to be a better way. Then I had the idea of using RIBBON instead of fabric for the ties! And it works!!!!
I have used both gross grain and satin ribbon, the 3/8 inch width) and cut the pieces as follows – 2 – 4 inch pieces and 2 – 18 inch pieces of ribbon. After I cut the ribbon, I put a little dab of Fray Check on the ends. The Fray Check REALLY works and keeps the ends of the ribbon from fraying out, even after washing!
Put the ribbon into the mask the SAME way as the fabric ties and put a barrel lock on the ends of the ribbon. It is MUCH easier to put the ribbon through the barrel lock! Tie an knot at the end of the ribbon and your mask is done!
To wear this mask, have the nose bar at the top and put the mask over your head so that the barrel lock is at the back of your neck. The (long tie) loop goes over your ear and you can adjust the tightness of the mask with the barrel lock. See middle photo of my granddaughter Maddie wearing the mask.
Adjust the nose bar and proudly wear your mask!
If you don’t need your mask, take the loops off your ears and the mask will hang around your neck and it won’t get lost!!!
Ribbon ties
Long tie loops around the ears
Proudly wear your mask!
The child’s mask is made exactly the same way as the adult mask. Use the child size mask (see first set of photos), the top and bottom “flaps” are 2 inches. When making the side (diagonal) folds, place the ruler 3/4 inch from the side edge.
I hope you enjoy this tutorial and if you have any questions, comments or anything else about this, send me an email atlongarmu@aol.com or leave a comment below.
I just finished quilting this too stinkin’ cute, Hawaiian Gnome quilt for my customer. The pattern is based on the pattern,A Tale of Two Gnomes, by Cotton Street Commons. As you can see, my customer used Hawaiian prints for the Gnome hats and switched the pine trees from the original pattern to coconut trees to continue the island “vibe.”
Click on any photo for a larger view
The quilt is 59 x 70 inches. I used assorted high sheen poly threads and Warm & White batting.
My customer made this quilt for her nephew and his family who live in Hawaii. The quilt will be hand delivered when a friend of my customer visits Hawaii in a few weeks.
Here are some photos of the blocks. The blocks are a combination of piecing and hand applique.
There was a fair amount of border area so I kept the quilting simple and did wavy lines to represent water. Where the block borders “overlapped” I also overlapped the horizontal and vertical wavy lines. These overlapping lines look like “fish nets” which, IMHO, enhances the island vibe!
My customer has picked up the quilt and LOVES it!!! She can’t wait for her nephew and his family to see it!
For the last few days the weather here in the Seattle area has been BEYOND hot! Yesterday, an all time record was set at 104 degrees and today it is going to be even hotter! Usually, we have one, maybe two days above 90 degrees, and sometimes we don’t even reach 90 during the summer!
Because the summers are usually mild compared to other parts of the country, most people in the Northwest do NOT have air conditioning. And guess what, I don’t have it either!
I am sitting under a ceiling fan and I am having a standing fan blowing on me. It’s till warm in my house – 84 degrees at 10:30 am – but the air is moving and it doesn’t feel too bad.
As this heat wave started, I began making some more neck coolers for myself and my family. I wrote about making the neck coolers a few years ago. For the post on how to make them Click Here
I am also keeping myself hydrated / caffeinated by drinking liberal amounts of iced tea and iced coffee! For a post on how I make my iced coffee Click HereThe “recipe” is towards the bottom of the post.
After making my large glass(es) of iced beverage, the sweat running off the glass was awful (I forgot how much iced drinks sweat!) and leaving puddles of water where ever they were placed. Which is not good when you are trying to piece a quilt top under the ceiling fan!
I thought to myself, “I need a coaster for under my sweaty glass!” And, of course, could I FIND a coaster? No way!
Then I was looking around my work area and spied these two fabrics from a patriotic quilt top I am working on.
Click on any photo for a larger view
As I looked at those fabrics, I “saw” a four patch coaster! And guess what I did? I made one – or a few of them!!
Here is what I did – I started by cutting the two fabrics into 1 – 3 inch x width of fabric (wof) strip and stitching the two pieces together along the long edges. I pressed the seam to the darker side. Then I sub-cut the strip into 3 inch sections the full length of the strip. I got 13 – 3 inch pieces from the strip. This will make 6 – 5 inch (finished size) coasters.
Then I laid out the strips to form the pattern
Then I stitched them together to form a 5-1/2 inch, 4 Patch block
But what about the quilting? I could have put them on the longarm, but that was too much of a hassle. And, there is no fan in my quilting room! So I went “old school” and quilted them on my home sewing machine! Yes, I still know how to do that!!!
I found some scrap batting (Warm & White) and scrap fabric to use as the backing, layered everything together, put my walking foot on my sewing machine and had fun!!
I kept the quilting super simple. One coaster I did “modern” stitching straight lines with white thread and the others I did straight lines with blue thread in the stars and following the “waves” of the stripes with white thread in the wavy fabric.
Modern straight line quilting
Combination straight lines and wavy lines
Last, but not least, I trimmed the blocks and put some binding on – again fabric from my scrap bag and I had quilted, patriotic drink coasters!
Now it is time to make a iced beverage, I’m thinking iced tea for now, and put my patriotic quilted coasters to work!
PS – I had the red and white wavy fabric in my stash. If you don’t have fabric like this, you can make your own red and white stripe fabric by cutting strips of red and white fabric into 1 inch strips and then stitching them together to form a striped fabric.
Here is an illustration of how this block would look. Note the placement of the position of the stripes on each part of the 4-Patch. Or you can have all the stripes in the same position.
Remember, you are the Queen (or King) of your own quilting world, and, as Queen (or King) you can do what you want when making your quilts!
If you make some Patriotic quilted coasters, send me a photo and I can post them on this blog.
My oh my!! I don’t believe it has been six months since I have posted to my blog! Where does the time go? These last few months HAVE been busy. Even though I have been somewhat housebound – thank you Mr. Covid – there is still a LOT of quilting to do, patterns to create, instructions to be written, samples to be made, etc., etc.
On New Year’s Day 2021, I hosted my annual Mystery Quilt Along class on the Longarm Classroom website. This year, the quilt was “Winter Stars” For more details on this quilt and online classClick Here
Click on the photos for a larger view.
The quilting, which was done with contrasting thread, was fairly simple feathers, but when they feathers “came together” they formed some secondary patterns.
When the dust settled from the Mystery Quilt Along, I began working on some customer quilts.
This quilt, Prairie Points and Pinwheels, 37 x 44 inches, was impeccably pieced by Connie M, and it is FUN to quilt!
I quilted a feather border and had the feathers dip in between the Prairie Points. The body of the quilt is quilted with an all over, free hand feathers and swirls pattern. Click on the photos for a larger view.
And today, I finished this quilt, 56 x 73 inches, for Shirley R. Again, an impeccably pieced quilt! This is theBoomerang Quilt pattern. You can view the pattern details by Clicking Here Click on the photos for a closer view
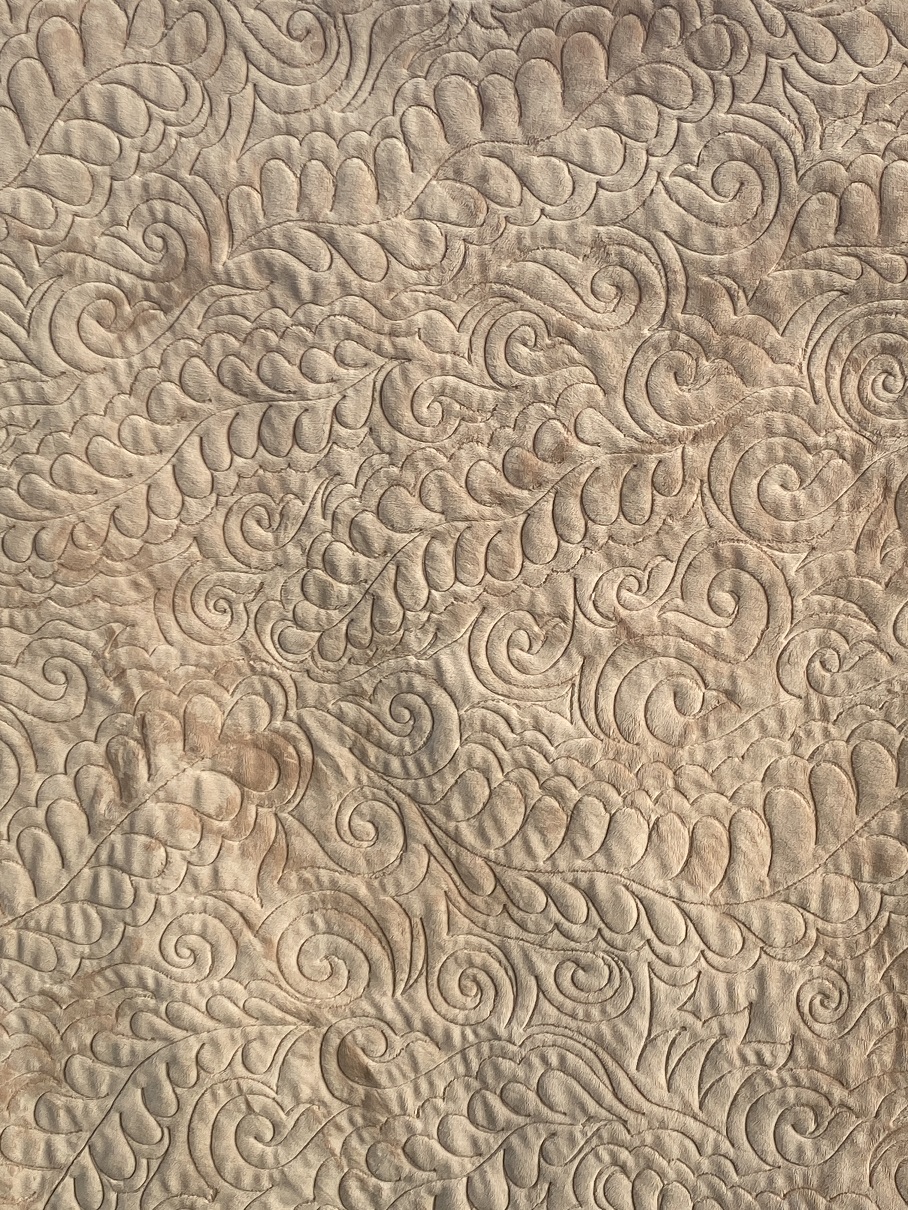
The quilting is all free hand with the matchstick quilting in the main part of the blocks and a diamond “spiral” in the smaller part of the blocks. The quilting was going along smoothly with no problems. Then, when I was finished and turned the quilt over, Oh NO!!!! I had the dreaded “big loops” on the back of the quilt. This has not happened to me for a LONG time!!! It started from when I put the last bobbin in the quilt. The quilting goddess is keeping me VERY humble!
So I took the quilt off the machine, took out all the bad stitching, put the quilt back on the machine and re-quilted the area. All the time checking the back for the big loops. Thankfully, the big loops disappeared and the back now looks wonderful. Check out the photos below.
Here are the dreaded big loops!
And here is the back of the finished quilt. I LOVE the texture on the back! You can’t even tell where I took out the stitches!
I am going to believe that my “big quilting mistake” of the year is now over and done with, and that all my quilting in the rest of the year will be problem free!